 When outdoor photographer Steve Kossack shoots in any location, he instinctively follows his "filter workflow." To help explain how it works, Steve offered these three images of an early-morning scene he recently visited with his annual Yosemite Valley winter workshop. "Once again," says Steve, "the endless photographic opportunities plus the exhilaration of being in such a magical place made for an unforgettable week. And because Yosemite is so magical, whenever we return to the locations we've visited in previous years, we find they are never the same.
"With a deep snowfall and the weather changing by the moment, even familiar and easy-to-get-to locations were neither," explains Steve. "Road construction prompted the closure of the north side road and forced us to take a short predawn hike to reach Valley View. We were well rewarded for the effort.
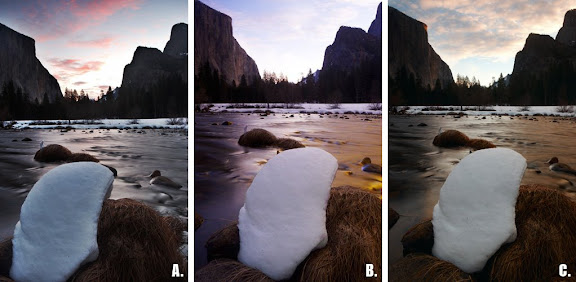
 "While standing in the dark, after hiking through the knee-high snow pack down to the edge of the Merced River, we saw the clouds getting pinker in the light blue sky, but only for a few moments. (Frame A -- click image to enlarge.) Not certain how much detail could be recorded in the shadow areas, I positioned the camera down low and tilted forward to include as much of the foreground as possible. To emphasize the color in the sky, the LB Color Intensifier was selected along with a 2-stop soft-step Graduated Neutral Density filter to reduce the relative brightness of the sky. Because the exposure would be for several seconds, I did not want to extend it too much further. The modest filter factor of the "lighter, brighter" Color Intensifier cost me only about half an f-stop. It's surprising how often my filter workflow begins with trying the LB Color Intensifier for early morning light.
"Soon after the first shot -- with the color of the sky now faded and the scene before me gaining even more contrast -- everything became flat. The river had some reflected light on the far side but the shadow area of the water was now dark with no reflection. (Frame B.) In cases like this my filter choice is often the Gold-N-Blue Polarizer and 2 or 3-stop soft-step Graduated ND filter. Anytime there is no reflection in the shaded areas, I check to see if my Gold-N-Blue can help out. Of course you need light to create reflections and the orientation of the sun has to be right for a polarizer. I reframed the composition just slightly to limit the amount of now colorless sky and highlight the river. Here the balance of the blue to gold polarization helped accentuate the natural flow of the river. A 2-stop ND Grad was also used here.
"My third shot (Frame C.) at this location was taken as the first light of the day illuminated the tip of El Capitian. Here's where the LB ColorCombo became the right choice. This time, the reflections from the river were distracting the eye from the focal point and the ColorCombo's polarizing effect tamed this problem nicely. The added warmth of the color intensifying filter (an integral part of the combo) was also a welcomed effect. Adding a 3-stop hard-step ND grad was used to achieve the finished image.
"A few days into our winter workshop it became clear the Merced River -- which was now a calm reflecting pool in many places -- was presenting us with dramatic photo opportunities at almost every turn and bend. The opportunities, in fact, were sometimes overwhelming -- a situation I always welcome! My filter workflow enabled me to rationally concentrate the left side of my brain while the right side was joyfully experiencing the dramatic winter scenery.
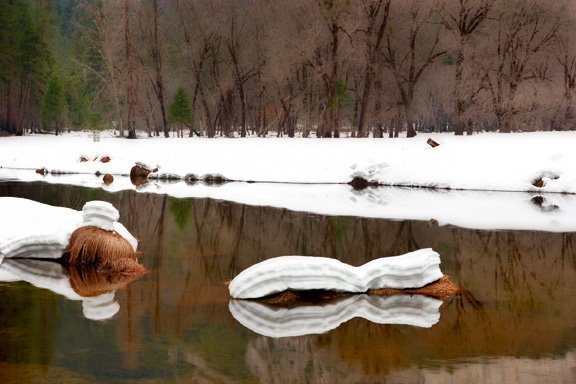
 "For this next scene, I choose to anchor the image on the left with the river bottom. The problem was that I could not see the river bottom in the reflection.
To help solve this and a few other problems, I chose the ColorCombo for several reasons. The first reason was the small bright green conifer at the top of the snow bank and its reflection in the still water. This green is what brought me to the composition in the first place. Whenever I see an important green element in a scene, my first thought is always the LB Color Intensifier or -- in this case -- the LB Color Combo which also provides 'lighter, brighter' polarization. To set the composition, I first found the best orientation for the polarizing filter by making my way down the snow bank to change the angle. Then a slight turn of the filter clearly revealed both the river bottom and the surface reflection. The polarizer was then fine tuned to cut the bright reflection off the snow as much as possible while still revealing the river bottom. Since the bright snow was such a major part of the composition, I realized it had to be exposed to capture both the overall scene and the detail in the white snow.
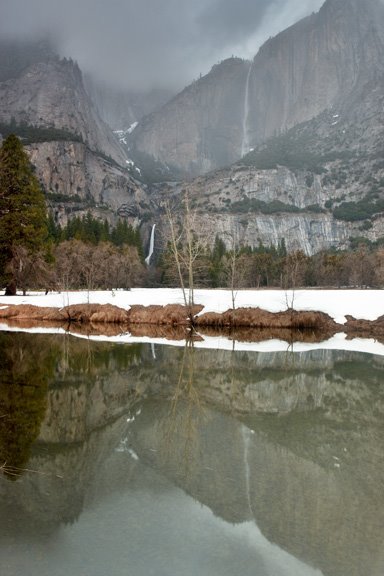
 "For the stormy image of Yosemite Falls seen at left -- with its beautiful muted light -- you would think no filters would be needed, but this image is not quite as simple as it appears.
Rain was moving in and out as the falls drifted from view and then appeared again. This also obliterated the reflection in the water at times or made it dark and distant when it was visible. The colors were also very muted in the mist. My next workflow step was to try balancing the exposure to render the mid-tones a full stop brighter and accentuate the reflected image in the process. The only problem created by doing this was a very slow shutter speed that would have made the quick moving clouds, as well as the rain spattered river, too blurry. The next decision was to test the capability of my new Canon 1Ds MKIII at a higher ISO 800 setting while using a 3-stop soft-step Graduated ND filter. What was lost was some of the detail in the snow, but what was gained is a brighter reflection, a more realistic presentation of the falls and a recognizable cloud pattern that shows the passing storm’s movement.
For me, working through the filter workflow process is both fun and productive. I should add that I always expose a 'reference" frame without any filters to provide a basis for later review. In the end, there are always choices to be made between the variously filtered images. I can’t help but feel that is always a good thing!"
For more information about Steve's work, videos and workshops, visit his website.


