Tuesday, October 28, 2008

Singh-Ray's new Vari-N-Duo "solved two problems with one filter in 8 seconds"

When Arizona-based landscape photographer Steve Kossack received his new Singh-Ray Vari-N-Duo Polarizing Variable ND filter, he immediately saw new possibilities. A few days later, Steve led his annual backpack photo expedition into the Yosemite Park high country and to a dramatic setting at Tuolumne Falls -- where the river drops into the Grand Canyon of the Tuolumne above Hetch Hetchy Valley.

"In capturing this image," says Steve, "I wanted to give the falling water a more serene effect than I was seeing, and I also needed to reduce the strong glare from the wet surfaces of the rocks. The glare, in fact, was masking much of the raw texture and detail of the rocks in the foreground. Both of these problems were addressed quickly and easily with the Vari-N-Duo. Using the front "min/max" ring, I had no trouble dialing in enough density to achieve the eight-second exposure in shaded daylight. I then rotated the polarizing ring just enough to cut the glare from the rocks without over-darkening the sky.

"This next image captured on the Madison River in Yellowstone National Park was a very different situation. Here the setting was almost too quiet and tranquil. The mist off the river was barely visible in the pre-dawn darkness and the long test exposures I was making hinted at the color that sunrise might deliver. I wanted to continue making long exposures, but as the morning light intensified my exposures with the Singh-Ray LB Color Intensifier were becoming much shorter.

"So I then switched over to the ColorCombo to cut the glare off the river as it began to overpower the brightness of the sky. Still what I saw in the viewfinder was not as appealing as what I had seen earlier. The sky, as colorful as it had become, was still not dramatic in my opinion. That's when I decided to try 'painting' with my ND Grad during a long exposure.

"With the Vari-N-Duo's built-in polarizer there was no need to stack filters together and then figure out which ring to turn. No more getting them stuck together either. The filter’s operation is quick and easy -- something I can do in the dark! After I adjusted the polarizer ring, I then did the same with the ND ring. I now had a 30-second exposure and all that was left was to experiment with my Graduated Neutral Density filters to get a pleasing exposure for the painted sky. I went from 2 to 5 f-stops and then back until the first light was completely gone. In the image seen here, a 4-stop hard-step brought it all together.

"From now on", says Steve, "I'll keep my Vari-N-Duo ready for all those times when I need to polarize a long exposure, and I'll also keep my trusty Vari-ND filter along side for those shots when I don’t need the built-in polarizer. Each has its place."

To enjoy more of Steve's fine-art landscape photos, colorful how-to essays and news about his workshops, you'll want to visit his website.

Tuesday, July 15, 2008

Let's think about how these two images gained color saturation and sharpness

Although photographers can find many articles and books advising us to put more thought into the creation of our images, it's not so easy to find examples of how a successful photographer actually thinks through the process. That's why we always welcome the fine images and thoughtful discussions of Arizona-based landscape photographer Steve Kossack.

"In some ways," says Steve, "these two seemingly very different images are very similar in terms of imaging style and technique. Both compositions 'read' from left to right which is the usual way we all like to see things. It's how we compose when we write in the English language and it feels like the most 'natural' flow whenever we arrange the images in our viewfinder. So the composition of these two photos was the easy part. The challenge was dealing with the different problems each scene presented which were solved the same way. Both images, in fact, were made by using a tilt/shift lens and the Singh-Ray LB Color Intensifier, but these tools were used in different ways for each image -- and for different reasons.

"Let's begin with this visit to Cedar Creek Falls which we reached by climbing off the trail in the back country of Glacier National Park We found this pristine setting totally engrossing, and we shot from many vantage points for over half an hour in the dense forest. The direct light, however, was causing problems. The shadows were deep and dark, and the reflected light off the water was almost four stops brighter than most of the rock face wherever I metered. A polarizer helped some with the reflections, but I still needed more help. The fern I used in the foreground to anchor the composition was swaying in the gentle breeze and my small aperture setting required for maximum depth of field was giving me a very long shutter speed. By switching to a tilt/shift lens, I was able to get both the foreground at the base of the image and the background area at the top in sharp focus while using a much larger aperture which in turn allowed me to use a quicker shutter speed to stop the motion of the fern. By also shifting the lens upward from its normal axis, I was also able to straighten the perspective of the top of the falls as a bonus. It no longer fell away because the camera's image plane was no longer tilted upward. As a cloud cover moved in and out, the late afternoon sun was more subdued and when a long 'open shade' break looked possible, I switched the polarizer for the color intensifier and gained 1-1/3 stops of light. The resulting increase in shutter speed made the frames that followed sharp and usable. Now with the much more even light, I had the exposure right. The dark areas became much more pronounced and the overall feeling would have been dull and somewhat flat without the Color Intensifier filter. My beautiful fern would have been almost colorless in the foreground. Green is a very dark and hard color for me to manipulate in post processing. This is one challenge I like to take care of in the field. As I removed the Color Intensifier at the end of the shoot, I took one more look through the viewfinder. I was right; the choice of the TS lens had actually sharpened the focus!

"Here at Indian Dick Camp in the depths of the Grand Canyon on the Colorado River, the problems were reversed. Rising from my sleeping bag a few feet from the river, the morning light was intense in the sky above the rim. The ground with reflected luminous light was warm enough to work with and even though the river was causing a slight breeze, the blooming Desert Datura was protected by the elevation of the river bank and its surrounding rocks and shrubs. That same bank needed to be eliminated from the image by lowering the camera to tell my story of the Datura's short survival in its hostile environment -- it only blossoms during the night and closes shortly after sunrise. The shade and its proximity to the river would tell this story.

"Again a tilt/shift lens made it possible to shoot from the low angle I had chosen to hide the river bank and get close enough to capture the lower blossom -- the two key elements of the composition. This time I did not need, or want, a fast shutter speed. The river was a muddy, unattractive and powerful flow that gave no readable reflection. The fast moving river actually detracted from the beautiful reflected light on the far- left canyon wall. Using a Singh-Ray 4-stop soft-step ND Grad evened the lighting and helped produce the 1-second exposure that not only gave the river the reflection but also a slight blur to the moving clouds above. As in the Creek Falls image, the LB Color Intensifier’s saturation helped produce a sharper, stronger image and yielded the deep green foliage that set the composition in motion!

"One of my favorite silly expressions is 'it's the same only different.' I say these two are!"

To enjoy more of Steve's images and essays and explore his many image galleries, you can visit his website.

Tuesday, June 3, 2008

In Yosemite National Park, you'll find dramatic landscapes come in all sizes

"At an elevation of only 4,000 feet," landscape photographer and workshop leader Steve Kossack points out, "the beauty and grandeur of the Yosemite Valley is accessible even in winter. And yet our Yosemite in Winter workshop each February always seems to encounter the unexpected. Whenever heavy snow conditions make it difficult to travel very far on foot -- as they did this February -- we're reminded to take a closer, more thoughtful look at the scenery right where we are.

"All across the 12,000 square miles of Yosemite National Park we find a wealth of 'big' pictures... deep valleys, grand meadows, ancient giant sequoias, and vast wilderness areas, but there's also much more. It’s the 'much more' I frequently discover simply by looking for the 'mini landscapes.' Blessed with today's mega-resolution cameras, precise lenses and professional-grade filters, we outdoor photographers can detail as never before the full range of textures and colors that nature delivers right to our feet. All three of these mini-landscapes from Yosemite convey that dramatic detail. They also demonstrate the benefits of the Singh-Ray LB Color Intensifier -- whether used by itself or as a built-in feature of the LB ColorCombo.

"The 'mirror' image (above) is a personal favorite that was recently featured in our Yosemite in Winter DVD. Attracted initially by the pattern of 'the diamonds,' we then refined the composition as you see here. The strong highlights in the scene were reduced considerably by the LB ColorCombo's polarizing effect. The result was a more even exposure. The ColorCombo, with both its polarizing and color intensifying ability, also cut the glare from the rocks to reveal more shadow detail and heightened the color contrast -- notice the darkened green just below the water line. In my opinion, this gentle reinforcement of greens is one of the filter's best features. Also note that the polarizer helps us see into the water down to the river's bottom while at the same time seeing the reflection on the water's surface. As I rotated the filter I could easily judge the best polarizing effects in the viewfinder. A bonus indeed!

"Because nature’s clutter is not easily undone or sorted out visually, this next 'forest floor' image may take more effort to appreciate. I try to compose my 'mini landscapes' by observing each element's shape, color, light and texture and then selecting and scaling down the various and random design elements. Here the impact of the green led to the selection of the LB Color Intensifier instead of the ColorCombo. The composition is what might be called 'backwards' -- meaning that the foreground and background are reversed in terms of their relative impact. The mystery presented by the light in the background is what interests me. The foreground shapes and design were just a way of getting there. The polarizing effect of the ColorCombo would have reduced or eliminated that effect. The greens were “punched” subtly with the Color Intensifier!

"This third mini-landscape from Yosemite was made with a Canon 24MM T/S (tilt/shift) lens. The capability of this lens to tilt forward and thereby increase the depth of field at a large aperture proved very helpful in the rapidly changing light. I wanted to capture that patch of sunlight at the bottom -- that I saw while setting up -- to help lead the eye into the composition. I also wanted the fastest shutter speed possible to capture this light as soon as it became possible, and I also wanted to use the LB ColorCombo's polarizing ability to cut some of the glare off the wet leaves. This setup allowed me to shoot wide open, use the filter and still obtain a fairly quick shutter speed that caught the light just when and where I wanted. Since the filter size for most of my Canon lenses is 77mm, I use a step-up ring to adapt my other lenses that have smaller front elements. While this works well in most cases, there are times when using a step-up ring creates an extra step that presents nearly as many problems as it solves -- as I was jamming the adapter-ring in the lens mount, I also managed to move the focus and, in this case, the tilt adjustment of the T/S lens. As a result, I almost missed the last light for this composition. This problem has now been solved by always taking along a 72mm ColorCombo just for the T/S lens! There's nothing better than having the right tool for the job."

To see more of Steve's landscape images and learn about his 2008 workshop schedule, visit his website.

Monday, March 24, 2008

Tracking the "filter workflow" through a winter workshop in Yosemite Valley

When outdoor photographer Steve Kossack shoots in any location, he instinctively follows his "filter workflow." To help explain how it works, Steve offered these three images of an early-morning scene he recently visited with his annual Yosemite Valley winter workshop. "Once again," says Steve, "the endless photographic opportunities plus the exhilaration of being in such a magical place made for an unforgettable week. And because Yosemite is so magical, whenever we return to the locations we've visited in previous years, we find they are never the same.

"With a deep snowfall and the weather changing by the moment, even familiar and easy-to-get-to locations were neither," explains Steve. "Road construction prompted the closure of the north side road and forced us to take a short predawn hike to reach Valley View. We were well rewarded for the effort.

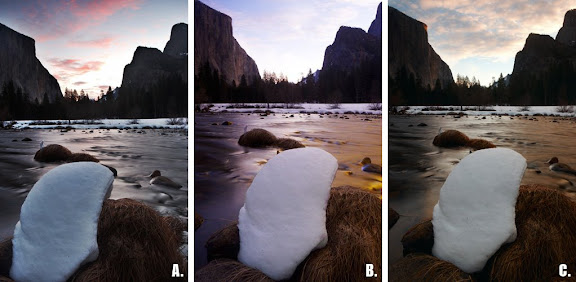
"While standing in the dark, after hiking through the knee-high snow pack down to the edge of the Merced River, we saw the clouds getting pinker in the light blue sky, but only for a few moments. (Frame A -- click image to enlarge.) Not certain how much detail could be recorded in the shadow areas, I positioned the camera down low and tilted forward to include as much of the foreground as possible. To emphasize the color in the sky, the LB Color Intensifier was selected along with a 2-stop soft-step Graduated Neutral Density filter to reduce the relative brightness of the sky. Because the exposure would be for several seconds, I did not want to extend it too much further. The modest filter factor of the "lighter, brighter" Color Intensifier cost me only about half an f-stop. It's surprising how often my filter workflow begins with trying the LB Color Intensifier for early morning light.

"Soon after the first shot -- with the color of the sky now faded and the scene before me gaining even more contrast -- everything became flat. The river had some reflected light on the far side but the shadow area of the water was now dark with no reflection. (Frame B.) In cases like this my filter choice is often the Gold-N-Blue Polarizer and 2 or 3-stop soft-step Graduated ND filter. Anytime there is no reflection in the shaded areas, I check to see if my Gold-N-Blue can help out. Of course you need light to create reflections and the orientation of the sun has to be right for a polarizer. I reframed the composition just slightly to limit the amount of now colorless sky and highlight the river. Here the balance of the blue to gold polarization helped accentuate the natural flow of the river. A 2-stop ND Grad was also used here.

"My third shot (Frame C.) at this location was taken as the first light of the day illuminated the tip of El Capitian. Here's where the LB ColorCombo became the right choice. This time, the reflections from the river were distracting the eye from the focal point and the ColorCombo's polarizing effect tamed this problem nicely. The added warmth of the color intensifying filter (an integral part of the combo) was also a welcomed effect. Adding a 3-stop hard-step ND grad was used to achieve the finished image.

"A few days into our winter workshop it became clear the Merced River -- which was now a calm reflecting pool in many places -- was presenting us with dramatic photo opportunities at almost every turn and bend. The opportunities, in fact, were sometimes overwhelming -- a situation I always welcome! My filter workflow enabled me to rationally concentrate the left side of my brain while the right side was joyfully experiencing the dramatic winter scenery.

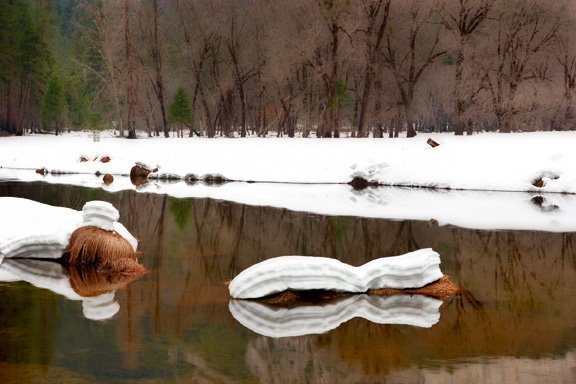
"For this next scene, I choose to anchor the image on the left with the river bottom. The problem was that I could not see the river bottom in the reflection.

To help solve this and a few other problems, I chose the ColorCombo for several reasons. The first reason was the small bright green conifer at the top of the snow bank and its reflection in the still water. This green is what brought me to the composition in the first place. Whenever I see an important green element in a scene, my first thought is always the LB Color Intensifier or -- in this case -- the LB Color Combo which also provides 'lighter, brighter' polarization. To set the composition, I first found the best orientation for the polarizing filter by making my way down the snow bank to change the angle. Then a slight turn of the filter clearly revealed both the river bottom and the surface reflection. The polarizer was then fine tuned to cut the bright reflection off the snow as much as possible while still revealing the river bottom. Since the bright snow was such a major part of the composition, I realized it had to be exposed to capture both the overall scene and the detail in the white snow.

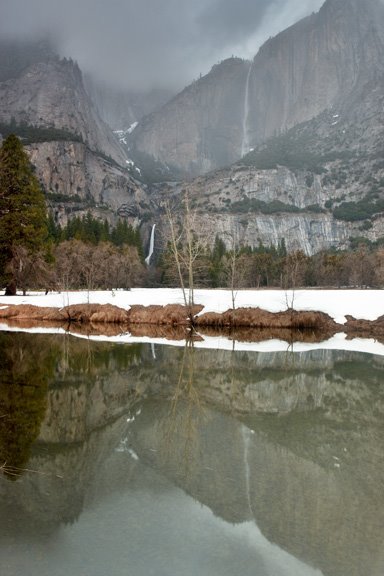
"For the stormy image of Yosemite Falls seen at left -- with its beautiful muted light -- you would think no filters would be needed, but this image is not quite as simple as it appears.

Rain was moving in and out as the falls drifted from view and then appeared again. This also obliterated the reflection in the water at times or made it dark and distant when it was visible. The colors were also very muted in the mist. My next workflow step was to try balancing the exposure to render the mid-tones a full stop brighter and accentuate the reflected image in the process. The only problem created by doing this was a very slow shutter speed that would have made the quick moving clouds, as well as the rain spattered river, too blurry. The next decision was to test the capability of my new Canon 1Ds MKIII at a higher ISO 800 setting while using a 3-stop soft-step Graduated ND filter. What was lost was some of the detail in the snow, but what was gained is a brighter reflection, a more realistic presentation of the falls and a recognizable cloud pattern that shows the passing storm’s movement.

For me, working through the filter workflow process is both fun and productive. I should add that I always expose a 'reference" frame without any filters to provide a basis for later review. In the end, there are always choices to be made between the variously filtered images. I can’t help but feel that is always a good thing!"

For more information about Steve's work, videos and workshops, visit his website.

Wednesday, February 13, 2008

Yes, it's the same place, but it's a different day!

"Returning to the same locations has always paid dividends for me," says professional landscape photographer and workshop leader Steve Kossack. "At this well-known spot, high over Death Valley at Aguereberry Point, I’ve been rewarded in the heat of summer and the cool of winter. Spring brings wildflowers to the valley floor in some years and the fall signals the end of the severe heat and more manageable photography temperatures. I'm always eager to revisit the wide open vistas of these ridges in all seasons -- anytime I can get there.

"In these three Aguereberry Point images," says Steve, "we see how the the passing weather sets the stage for a beautiful and distinct image any time you're there.

"This first image is the result of fortunate timing and the use of a device called a lightning trigger. While watching an approaching storm, my excited anticipation of being able to capture a lightning bolt in daylight suddenly became a reality. The trigger prompted me to frame the composition at a very wide angle because the sensor scans a wide area of the sky. This wide-angle view provided enough space for the lightning bolt to fill the entire left half of the frame, a big benefit I did not anticipate at the time! The trigger also calls for a slower shutter speed than I would normally use, so I chose to use only my LB Color Intensifier and retain as much depth of field (smaller aperture) as possible. Using the Color Intensifier provided the added benefit of heightened earth tones while maintaining that necessary shutter speed. I especially like this filter's small filter factor -- it's only about 1/3 to 1/2 of an f-stop."

"This 'Moonrise at Sunset' image is the tighter composition I would have liked for the lightning bolt shot, but as you can see, it would have not worked! Here the focal point is the moonrise and the composition was narrowed and lowered. The stage was set and the curtain rose! The LB ColorCombo was chosen this time to heighten the contrast and deepen the color. My favorite moon exposure filter is the Singh-Ray 5-stop, soft-step ND Grad. I find the filter perfect for this situation and, in my workflow, easier and more predictable than stacking filters. The detail retained in this moon is the proof!

"This third 'Sunset Storm' image was my reward for knowing the “when and where” of this same location. Arriving on the heels of a quickly passing storm, I had no time to get where I wanted for the set up. Instead I settled for a perch above and quickly rethought the composition. Since the color was the focal point I needed only to adjust the angle and isolate the scene. The solution was a longer lens and the use of the Singh-Ray LB Color Intensifier and 2 stop, soft-step ND Grad to “snap the clouds” from the quickly fading light."

This location is always part of Steve's Death Valley 5-day workshop. The entire lightning-shot sequence, by the way, can be seen in Steve's new Death Valley DVD.

Wednesday, January 23, 2008

Catching "The Wave"

From his home base in Arizona, outdoor photographer Steve Kossack has been a frequent visitor to The Wave located in Utah's Paria Canyon. "Each and every expedition has been different in some way," says Steve, "but this year's experience during our Landmarks of the Southwest Workshop was like none before.

"We had snow! We also had rain, wind, hail, sunshine and clouds. Temperatures ranged from the 20s to 50s -- and sometimes there was not much time or distance between the two! It was the perfect time to be photographing in this exciting area of Arizona and Utah.

"This workshop was also the maiden voyage for my new Canon 1Ds MKIII, and I was eager to test its awesome capabilities. In the image above I faced a situation I'd never experienced before. As these images demonstrate, few scenes in nature translate as dramatically as red rock and fresh snow. However, it can be a very difficult exposure to do properly. Diffused light was key here. The magnificent detail held in the snow was more and more difficult to hold when direct light was present. This image is a 'stitch,' comprised of four vertical shots taken quickly in the same light to convey the density and volume of the snow. I felt I needed to have a strong foreground to enhance the feeling of deep snow without losing the stark color of the sandstone. The wind erosion in the snow seemed to make the wave roll!

"This next image is a single exposure taken shortly after to help me get a feel for the resolving power of my new 'super camera.' The fact that most of the sandstone on the south slope (left) was snow covered made the scene seem more sedate. I did this one frame from the same tripod location at 24 mm with my Singh-Ray LB ColorCombo. I believe this image more faithfully captured the scale and scope of our perceived experience. Detail was easier to display and exposure was now acceptable in the more direct light. Since the detail in the snow shadow was no longer a major part of the composition, I simply let the shadow fall where it may. Both images are a well deserved reward for the effort involved on this beautiful day. A day I know all our workshop participants will long remember!"

Steve will soon release Great Smoky, another in his series of instructional DVDs that will include a discussion on the use of Singh-Ray Filters. It will be available soon at Steve's website.