Tuesday, January 22, 2013

For veteran photographer Steve Kossack, an unexpected chance to visit Hawaii proves to be a lifetime experience


"The wonderful thing about life is that we never know!" says landscape photographer Steve Kossack. "We create this crazy illusion that we control our lives, yet when I think about it, I realize how little is planned and how much is serendipity. In my quest to see and photograph in all the National Parks, I find myself still twenty-one parks short. Out of the fifty-eight locations that carry the N.P. designation, I've now visited thirty-seven.

"The Hawaiian Islands is about the last place I expected to have any chance to visit. My little rule has been that if I can't drive there, I don't need to go there! However it was easy to break that rule when the opportunity presented itself. Since I had never envisioned myself there, I had no preconceived ideas about what it would be like, other than I certainly wanted to see the two National Parks.

"Booking a pre-dawn flight to Maui and picking up a rental car, I was atop the crater at Haleakala National Park by 10 am. A long switchback drive up the mountain was punctuated by heavy vehicle traffic coming down the mountain. The crater rim is just above 10,000 feet and of course I started from sea level. I'd often been told that sunrise was exquisite and I planned on photographing one, but I'd missed it this first morning and arrived at an almost empty visitor center parking lot. I was greeted inside by a lone park ranger behind a small desk. 'Welcome to The House Of The Sun' was the greeting. 'That's what the word Haleakala means,' he continued. I was quickly off and running. The view of the crater from the window (above) made me want to leap through it!


"Headlong, I plunged three miles down into the Haleakala crater. The trails were deceptive in the same way the distances, scale and scope were to photograph. As a tourist on foot I was overwhelmed and began to mostly document what I saw. Everywhere I stepped there was evidence of volcanic upheaval. The silence was deafening in effect. I could easily see how explosive this place must have been. Noise and heat. Steam and flame! But today it was cold and sometimes damp. I let the clouds substitute for steam. I was afloat in space and time. The rock foreground gave the feeling of a barrier separating safety from the unknown of the inner crater. The three miles back out was proof that I was hiking an inverted mountain. It took twice as long to get out as it did to go in. As I rested often, I was amazed at how much the scale changed. With the blue sky making cold shadows, I used the LB Warming Polarizer and two-stop soft-step ND Grad to hold detail in the clouds.


"Pre-dawn set-up is simply a circus. A deserted park during the day becomes a Disney-like carnival well before first light. People arrive as early as 4 AM and the park rangers become parking lot attendants stacking cars in deep rows in the dark. People coming from the tropical warmth down below were unprepared for the cool air and wrapped themselves in towels and blankets. They took on the look of pilgrims stumbling to the rim for sunrise. Within moments after the main event that is sunrise, the reverse happens. As soon as enough people return and untangle enough vehicles to move, it starts what looks like a line of ants descending down the mountain. I was fortunate enough to experience two sunrises both at around 30 degrees F. I got the feeling that no two mornings would be the same here. I'd like to spend considerable time finding out if this is correct! Made on different mornings, the lead image (top) was taken with a 4-stop hard step ND Grad and this heart stopping one was made with a ColorCombo and 3-stop soft-step ND Grad. It was like flying without an airplane!

"The rain forests were something I was not prepared for. They give direct and immediate meaning to the phrase, 'you can't see the forest for the trees!' The clutter and disarray was at once both beautiful and daunting. Finding detail everywhere made the seemingly easy job of composition almost impossible. The deeper I went into the forests, the more difficult it got. I set this task aside until the end of every shoot in hopes the answer would appear. I thought of Ansel Adams as he described his affinity for Southwestern landscapes that were naked and exposed rather than here where they were camouflaged everywhere. There was simply too much of everything. My answer was to step back! Starting at the base of this waterfall was fun but cluttered. Climbing to a vantage point above proved more productive but it felt sterile in the sense that it looked for all the world like every ad photo in the magazines I saw on the flight coming over.

"Photographically, it presented big problems. In the gentle but constant breeze, I realized that all the surrounding foliage was moving and would be impossible to stop. Even if it were possible, it would look like a hand grenade had gone off! My answer was a great new tool from Singh-Ray. The 10-Stop Mor-Slo Neutral Density filter. Quick and easy to use, I took note of the existing shutter speed, placed the filter on the lens and added 10 stops of exposure time to my shutter setting... and fired! The light gathered during the 50-second exposure produced the glow. Note that NOTHING in this image is sharp!

"My best solution for the chaos of the rainforests was to go wide and low angle. This afforded the feel of being engulfed and surrounded, as I was in reality. The overhead canopy was even more engaging than the dense growth on the floor but it was very difficult to find lines that didn't intersect or deep shadow that did not hide important detail.

"This dilemma eventually led me to choose my Canon 17mm Tllt/Shift lens and many different exposure combinations. As I always do in this situation, I made two exposures of each shot -- one for the shadows and the other for highlights -- just in case a composite was necessary. In the end I was successful with a 4-stop soft-step ND Grad. I took care to block both the reflection and reflected light from behind using my filter pouch just behind the filter and above the lens. This is a lesson I've learned when using this extremely wide angle lens with my ND Grads.


"On the 'Big Island' of Hawaii, the renowned volcanoes of Kilauea and Mauna Loa are found in Hawaii Volcanoes National Park. This is a small park in comparison and is just off the main highway that circles the island. Unlike most of our national parks that feature driving as the main way to see the highlights, this park has only a small area available to the automobile. Since its eruption of 2008, the Kilauea crater road is only partially open. Instead the many foot trails in the park provide different views and access to the different areas. The thrill of emerging from deep rainforest on the sheer cliff edges of craters and then back again was most inspiring and at the same time almost impossible to photograph! Here at sunset, the phenomena that sees the rainforest getting over 200 inches of rain because of the volcano became the story. To tell it, I found myself behind the old Volcano House Hotel, which was closed for renovation, making the area quiet and deserted. Knowing that Mark Twain (of Tom Sawyer and Huckleberry Finn fame), wrote of this very same location in his novel Roughing It, made me even more aware of the history here. I came very close to just watching this lovely sunset. Photographing it almost interrupted the event. I used my Color Intensifier and 3-stop Reverse ND Grad since the brightest area was just above the horizon.

"I found myself constantly trying to tell the story of both the rainforest and the active craters. Here at Kilauea lki Crater, you can witness a cooling lava lake with steam vents and the fountain eruption location from 2004 visible from the rainforest on the rim and then travel by foot trail down to the lake itself. Although this area gets high foot traffic, it still seemed as if I were alone most of the time. As in all our great parks, I'm always taken by the expressions of joy and wonder as I pass visitors. Here I was tempted to ask strangers if they could take a picture of me before they could ask the same of me!

"This last image called for using my ColorCombo to cut the glare off the foliage and saturate the greens.

"Experiencing these two national parks far outweighed the photography. I'll need much more time and many trips to begin to know what images I should capture, as well as how to capture the best images of these wondrous parks. I'm happy to leave this matter for another time. On this trip, being there was everything. I had to remind myself constantly that I was actually there. In many ways it now seems like some sort of south pacific dream. The warm trade winds with the glow of the setting sun still remain. To the Islands and its people I say a warm Mahalo and Aloha."

You can always get more information about Steve's photography, travels and upcoming workshops by visiting his website.

Wednesday, September 5, 2012

Steve Kossack reminds us that national parks offer endless opportunities to enjoy nature's blessings

"Our national parks are distinctly unique. Wallace Stegner described them as America's best idea!" Steve Kossack reminds us, "our country has set aside these vast areas of natural beauty and geological wonders for the enjoyment of all the world's citizens. In times of economic downturn, our national parks become public refuges. Most of the workshops I lead are in our national parks. Fine art landscape photography can be done almost anywhere, but it's the emotion and spirit of the parks that I find extra stimulating. It's not only where, but why I photograph!

"This summer prompted thoughts of revisiting several of the national parks I've not visited for some time -- parks off the beaten path and the road less traveled. I thought I'd try shooting from a different perspective as well. In a nutshell I would visit three of the quieter parks, two volcanoes, and the tallest trees in the world, with only Canon's four tilt-shift (T/S) lenses in my bag. (In 17mm, 24mm, 45mm and 90mm focal lengths.)

"Tilt-shift lenses are designed to control depth of field and perspective. They can dictate what is in or out of focus, as well as what lines of sight are straight or slanted. They can be adjusted to change size and scale. These lenses are manual focus and take time and effort to use. For the most part I become much like a view-camera photographer making many lens movements and constantly refocusing. For me these lenses offer opportunities not present in fixed lenses but like any tool, they can destroy an image just as quickly as make one! For insurance, I added to my kit a Canon 50mm 1.2 lens. In the low light that I usually like and shoot in, I find some instances when I'm not able to see well enough to focus with the T/S lenses and this fast and bright lens gives me the ability at times to set up a shot, at least initially, that I can't make with the other lenses.

"My first stop was Redwood National Park, which is located on the northern California coast and has a major highway, CA 101, running through most of it. Redwood is comprised of several state parks along with the national park just outside the little town of Orick. This vast woodland could consume months of a photographer's time but like many of the parks, it can also be enjoyed and photographed in short day trips. The national park has two major areas; The Lady Bird Johnson Grove where the park was founded and The Grove of Big Trees which is accessible by permit only. Campgrounds and lodging are almost everywhere!

"The image above was captured with a wideangle T/S-17mm lens that allowed me to get intimate detail up close while still revealing the habitat my focal subject lives in. Here surrounded by hundreds of various species of cluttered trees, I was able to show the majesty and girth of this scarred redwood tree that towered over everything and still hold detail in the forest beyond. Setting up with my 17mm T/S, the rise or shift control gave me the composition I wanted while the camera body maintained the level sensor plane rendering all trees vertical and not falling away as would have been the case with a standard lens pointed upward. This was all that was needed since most of the forest in view was still and I could stop down a bit for depth of field. If you have experience with Canon's new 17mm tilt/shift you'll know that it has a bulbous front lens that makes it impossible to attach filters. However I have been handholding my Singh-Ray graduated ND filters with much success. The trick is to keep the filter level to prevent some parts of the image from blurring. I use my camera's depth-of-field preview to judge where the filter is in my frame. I don't find live view helpful. Of course I needed my larger 4x6-inch versions of the Singh-Ray 3-stop soft-step ND Grad series and had to be careful not to get my fingers in the frame!

"This next image from Redwood National Park was simply breathtaking to make! Again the T/S 17mm was kept level on both planes, horizontally as well as vertically. Then the problem was to place the sun behind the tree with just enough showing to highlight the rays. Next was the use of the Singh-Ray 4-stop soft-step ND Grad and how to place it in the frame. I quickly realized that all would be in vain if the blue clearing at the top left were over exposed. As the sun moved so did I. It was only moments before the effect was gone and I had to set it up a few inches away all over again. The path was the main part of the composition and the grove had very few people in it at this early hour. As a matter of fact most that were there had gathered to watch me working! For perspective, I wanted people on the path and this is the only frame from dozens that answered my request. I was about to ask for volunteers to stage it when these two appeared out of the fog. Can you tell that they are headed in different directions? I waited as long as possible for them to come close to each other. The fact that one is in red was a gift sent along with those photography rays!

"The Grove of Big Trees at Redwood National Park contains some of the tallest trees on the planet and is as much fun to get to and from as capturing this photograph. It is a fairly strenuous hike to the grove. At midafternoon there was almost no direct light anywhere. The solitude and isolation were at once startling, thrilling and overpowering! The tall trees were everywhere but their lower trunks were almost overwhelmed by ferns and maples covered in deep moss. To make a composition from all this was daunting. My solution was again to set the habitat and let the over 200-foot-tall trees be merely the pillars with a foundation of ferns. The only suitable direct light I saw all afternoon led me to it. The tilt feature allowed for the straightening of the trees in the background while the rise set the stage with the ferns. Being down in a gully made both appear to fall away from me. As you can see, that effect was nullified. Singh-Ray 3- and 4-stop ND Grads were combined with the 4-stop stacked slightly higher in the sandwich.


"The parks were never assembled in any set or logical way. They are instead simply jewels strung together one at a time to make a beautiful necklace. Not all are equal and not all are the same. Crater Lake was the fourth National Park to be established (1902), and it is unique and unusual. At first glance it boggles the mind! An exploded volcano that left a caldera that was eventually filled by only rain and snowmelt. There are no rivers or streams that flow into the lake which is why it is the purest and deepest in the country, if not the world. The fact that it became a national park so early is what kept it from becoming what Lake Tahoe is today. The lake is 6 miles across and sports two islands. Today the newly rebuilt lodge is still the main feature with the visitor center and usual concession area. The majority of visitors are harbored here with most of the rest in vehicles at overlooks on the loop road. If you are willing to hike even a short distance you will find that the park is quiet and peaceful. I find this place highly inspirational and almost impossible to photograph!

"At sunrise in the crisp cold air, the 24mm Canon T/S 24mm provided the desired field of view over Crater Lake from this distance. Struggle as I might with various positions, however, I could not find a vantage point that held the scale. That was solved with the fallen tree. As I scouted the area I found this was one of the few places that you can actually get below the rim safely. Most of the rim is sheer cliff and at first even the loop road seems treacherous to drive, let alone hike. The rise/shift enabled the view above the stump and the tilt allowed me to "lean" the stump toward the lake giving the feeling of pulling it up by its roots!

"Lassen National Park in northeastern California is also off the beaten path for most and contains geological features found around the Yellowstone area. A state highway that closes for the winter season is the main access to most of the well-known areas of the park and winds its way around three quarters of the volcano. Although dormant now, Lassen Peak exploded twice in a matter of a few days almost one hundred years ago. It takes a little hiking to witness the thermal features.

"Finding a setting with as many of the parks features as Kings Meadow offers was a gift, and I did this particular set-up three times! I was reminded of Tuolumne Meadows in the high country of Yosemite and how short the time of green meadow grasses are there as I pondered a composition. On this almost cloudless morning in the meadow before the volcano and in the dark I used my Canon 50mm f1.2 for visibility and made several thirty second frames wide open to tweak the composition. As suspected, pointing downhill rendered the trees on the right and the volcano leaning severely and smaller in scale. As soon as I had enough light to focus manually I switched over to the 45 T/S and mounted a Singh-Ray ColorCombo being careful to keep the reflection and still be able to see into the river. At times the wind picked up and the plants in the foreground began to sway.


"This final image was captured at Manzanita Lake, which is located in Lassen Volcanic National Park. One of the inescapable feelings as I visit any of the volcanoes in the Pacific 'Rim of Fire' is the fact that they can become active again at any time. Sure there exists modern equipment to measure movement and loads of people interested in monitoring every aspect every minute, but as I watched a thunderstorm develop to the west and then some of it dissipate over Manzanita Lake with wafts of smoke from campfires, I could not help feeling that I was waiting in tranquility for the next 'blast' and that it might occur before dark! Here the T/S 24mm was used without tilt or shift. I've I learned that in photography and especially in life itself, just because you can make adjustments does not necessarily mean you should! However, I did use my Singh-Ray ColorCombo and a 4-stop soft-step ND Grad to lend the finishing touches to the light."

Steve still has a spot or two available in his upcoming Eastern Sierra Fall Color Workshop October 13-17. You can get more information on the workshop, or Steve's other work, by visiting his website now.

Tuesday, May 22, 2012

Steve Kossack's visit to Death Valley NP was his first chance to check out his new tilt/shift lens

"I begin each of my workshops in Death Valley National Park by saying that we're standing in the lowest, hottest, driest and windiest place on the planet," says veteran outdoor photographer Steve Kossack. "I then add, 'on most days.' Our visit this year to Death Valley followed a far-from-ordinary winter in California, so we weren't too surprised to be greeted this spring by some rather hostile weather. In a short one-week span in mid-April, the temperatures fell from almost 100 degrees F to the mid 20's, and then headed back to the century mark again as we departed. Snow fell at daybreak, wind and rain tried to chase us off ridges, but colorful sunsets and a break from the really hot weather made for some great shooting days as well. From elevations of almost 300 feet below sea level to more than 6,000 feet above, this magical landscape gave us more to experience and photograph than we could have imagined.

"The image above of Zabriskie Point was captured at my favorite sunrise location, bar none. This image is also noteworthy as one of the first taken with my new Canon 24mm Tilt/Shift Lens Mark ll, which, as its name indicates, is one of Canon's newest tilt-shift lenses. Now that I've seen the greatly improved optical performance of this lens, I'm tempted to shoot every frame with it from now until forever! It is just that good. For this image, I wanted to raise 'the platform' we were shooting from. Since the Mark ll allows tilt and shift movements in any direction, I simply made the lens tilt downward along the same vertical axis as the upward shift of the lens. This accentuated the sand-colored shelf on which my tripod was set up, making it look more like a cliff instead of a small hill. The stage was now set for the magnificent sunrise we witnessed. All that was needed, as the intensity of the light increased, was the use of a Singh-Ray 3-stop soft-step ND Grad and then, as the direct light made its way to the Panamint Mountain range across the valley floor, I switched to a 4-stop soft-step ND Grad for this frame

"This next image was taken at Aquereberry Point 0as the morning snow dissipated. Yes, snow in April in Death Valley. We witnessed no more than a few seconds of partial clearing. Setting up a shot I made many times before gave me the freedom to watch and wait. It paid off big after making the movements of the T/S to straighten the vertical lines of the foreground rocks while holding the depth of field at near infinity. Knowing that I would need the quickest shutter setting possible to stop the motion of the moving clouds -- thinking that a slower shutter speed would render fast moving clouds a gray mess -- I then raised my ISO to 800 and again waited. In the moments of clearing and light that followed, I was able to make only 3 frames at a wide open f/3.5 as I inserted a 3-stop hard-step ND Grad horizontally across the lens. At this point, I had to stop and watch the last few seconds before the entire scene disappeared. It was all simply breath taking!

"It's been many years since I added anything to my basic photo gear. As I get older, I think more like a backpacker than a pack mule! These days, I'm more inclined to use the smaller lighter pack, with the zoom lenses, rather than the much bigger and heavier one that contains the fixed-focal-length lenses. I've long traveled with both packs and usually make a decision according to how far and how long when I depart the vehicle or campground. Today two zooms and an extender will usually suffice, with one exception. My tilt/shift lenses go with me no matter which pack I choose.

"This sunrise image of the southern basin of Death Valley was captured at Dante's View. After several previous attempts to get a break in the weather, we finally got one. In the pre-dawn light, we could see more than a mile down -- from over 6,000 feet above sea level dropping to almost 300 feet below sea level on the floor of the basin. We stood awaiting the sunrise. Since the wind was sporadic, I began making frames in between gusts but quickly changed my setup to include mostly rock so as not to be concerned with moving objects. After working many frames with the Singh-Ray Color Intensifier, I switched to the ColorCombo at first light to reduce the glare and haze. As the bright sunlight muted the color in the clouds, I then ran through my ND Grad filters starting with a 2-stop soft-step and working my way up to a 4-stop hard-step. The frame shown was captured with the ColorCombo and 3-stop hard-step.

"No place in Death Valley reveals more clearly the hand of man than Twenty Mule Team Canyon. This is where the Borax company had their first operation and where the teams of mules set out on their 120-mile trip to deliver the goods to the railhead. If you stand still in the morning light on the ridges of this now quiet setting, I think you might imagine the sound and struggle that took place here some 100 years ago. For me, this is long-lens country. In the cross light here, there seem to be many compositions that work no matter what the weather or light situation! Here all that was needed was to pick some lines that went dark-to-light-to-dark, then dropping my modified Singh-Ray ColorCombo into the filter drawer of the Canon 300mm 2.8 IS and adjusting the filter's built-in polarizer to cut the glare of the brightly lit rock. I metered for the mid tones. It's a rare day when, using this lens, I don't want the ColorCombo. I have a bad habit of leaving it in the lens. If I can't find it when working with the 500mm, I know it's still in the 300mm, or vice versa, but I rarely have both with me in the field. Having a filter to leave in each lens would be the ideal solution!

"As much as I enjoy photographing in the Dunes, I find it difficult to come up with images I consider unique and creative. Maybe that's why I've tried long and hard, with varying degrees of success, and so many drastically different compositions! Angle of view and degree of light are the keys. Exposure even more so. To get the highlights glistening off the early morning sand patterns is difficult to say the least. Careful metering gives way to best guess -- as the intensity of the light increases with each second after sunrise. Choosing where to meter for this frame brought both the highlights of the foreground sand and the sweep of the huge dune into usable zones. Just before actual sunrise and direct light, I attached the ColorCombo knowing that I would have to visually check the orientation to make sure I did not cut the highlights from the foreground. With the direct light, the next step was choosing a 4-stop soft-step ND grad to hold as much of the bright blue sky light as possible. This frame is simply all about the exposure and the filters used to get it.

"Death Valley is the place that initially drove me to learn the art of landscape photography those many years ago. It's a place where I return to remember this fact, to learn more, and to enjoy the beauty of nature."

You can find a number of other images from this year's Death Valley workshop in the "new images" section of Steve's website gallery. He is currently preparing for his Yosemite High Country workshop in September and his Eastern Sierra Fall Color workshop in October. More information is now available on his website.

Tuesday, April 3, 2012

Steve Kossack had to quickly refocus when he found no snow had come to Yosemite Valley this winter

For a veteran outdoor photographer like Steve Kossack, "Yosemite Valley is the best seven miles on the planet! I have believed that since my first visit in 1980. The park itself is vast and almost all wilderness. It is a wonderland of granite and water with sheer cliffs, beautiful waterfalls and lakes. There is no one season that's better than the others, and photographers should experience it in all seasons!

"Each summer I lead a photography workshop to the 'high camps' along Yosemite's mountain ridge line, far removed from the more civilized valley floor. The high country provides more seclusion and tranquility and is quite unique in many ways, but over the years I've come to appreciate the winter months on the valley floor just as much. Every winter the valley seems to provide something different, and this year was no exception. This year it was fall all winter long.

"With an elevation of only 4,000 feet, winters in Yosemite Valley don't get a lot of snowfall that stays very long on the valley floor. On the peaks that tower over 9,000 feet directly above the valley, however, there is almost certain to be a heavy snow cover. On the other hand, in the valley the weather is always a guess until we are actually there. Some years we may find snow drifts over our heads and sometimes hardly any cover at all. In the fall, the trees go bare and some of the waterfalls go dormant. When we arrived this past February, we found Yosemite Falls to be a mere trickle in the frozen morning and Horsetail Falls only 'a wet spot.'

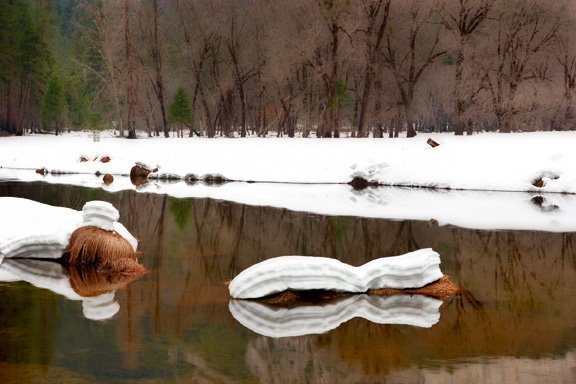
"The image above of Mt. Watkins reflected in Mirror Lake, was actually 'discovered' as I was photographing the reflected image of the red tree seen in the fourth photo below. This was the opposite of finding a picture within a picture. As I worked the previous image, the sky began to open some and the changing light brought fresh highlights and detail to my attention. As I watched the changing light, I could see that all that was needed to also photograph the image that was surrounding my close-up image was a change of lenses. I then mounted a 35-mm lens on the camera and attached the ColorCombo filter, orienting the filter's built-in polarizer to give a partial view into the river in the foreground without entirely removing the reflection. I then used a 4-stop soft-step Graduated ND filter to hold the marvelous detail of the sky.

"This next image shows one of the iconic views of Yosemite that is always a stopping point for me. Through the seasons, the angle and direction of the light changes dramatically. In many places, this one being a prime example, I could be content to simply leave my camera set up and open a shutter morning, noon and nightfall in every season of the year!

"This image, however, presented some challenges. The first was that this popular vantage point on the Merced River had at least a hundred people on the banks to watch the passing storm. Finding a place just to set up proved difficult. The second challenge was the lack of snow cover on the far river bank and meadow which I felt detracted a bit from the scene. Then, in the last few minutes, the solution arose when the scene took on fresh colors as a gloriously muted light found its way through the clouds. A canopy covered us overhead and the soft reflected light set the scene aglow. This effect was so stunning that most of us took time away from our viewfinders just to absorb the spectacle! The movement in the clouds and river were rendered by a 6-second exposure and color heightened with the use of the Singh-Ray Vari-N-Trio and light from the sky balanced with a 4-stop soft-step Graduated ND filter.

"There are areas of Yosemite Valley that get little direct sunlight during the winter months. If you know where to find these, they can appear to be in deep winter regardless of the situation elsewhere. Under circumstances such as this very dry winter, finding these locations improves the photographic opportunities and brings fresh detail into the shoot. Here as the Merced River turns and slows, the still and chilled morning air rendered the bare trees on the banks frozen while allowing the trees with leaves to remain green. The color green in any of my compositions, which I find is one of hardest to manipulate in post processing, is always cause to reach for my Singh-Ray Color Intensifier. Wanting to slow the shutter speed while cutting the glare from the water and bright snow, I then decided on the ColorCombo that combines the color intensifier with a warming polarizer to get the three effects I needed to make this image.

"On a cloudy day when the sky becomes a canopy of soft reflected light, it almost always leads to images with deeply saturated color. What's more, it takes away heavy shadows that would normally make for difficult exposure problems. That was the kind of light we were working with in the area around Mirror Lake and Meadow. The snow around the base of this mostly bare tree caught my attention and the red glow in the water gave life to the composition. I wanted to work with the red glow but did not want to take away the reflection of the bank. This element was crucial to the composition in my mind. This image was made with the color intensifier, which has no polarization and very little filter factor to be concerned with.

"In years such as this one with so little snow on the ground, we are nevertheless grateful that the walking and hiking were made easy. We covered just about all of the valley floor in our 5 days and proved once again that in any season, no matter the weather conditions, Yosemite Valley is the best 7 miles on the planet."

Steve is now taking reservations for his Yosemite High Country workshop in September 2012, and his Eastern Sierra Fall Color Workshop in October -- for more information, check out Steve's workshop schedule. For more news, fine outdoor images, DVDs, and more, visit his website.
Friday, December 9, 2011

Disguised as a wandering landscape photographer, Steve Kossack captures New York City

"I was raised in Los Angeles," says veteran outdoor photographer Steve Kossack. "It was a big sprawling city even in those days. One block looked like the next. I don't have any photography to speak of from those days because I always felt that nature was elsewhere. I've never looked back and, through my photographic travels and workshops, I've been treated to some of the most beautiful and scenic locations imaginable. The National and State parks throughout the American West are my home and photographic focus.

"Nevertheless, I recently had reason to visit New York City -- arguably the greatest city in the world. This visit was my third, and it was just totally exciting and fun! Dragging my photo gear through this metropolis was a first. To my surprise, my appearance wearing a beat-up shooting vest and carrying my trusty tripod, and photo backpack was hardly noticed by anyone. Nothing seems out of place in the Big Apple! People were moving in all directions at top speed and the towers of the city provided a glowing backdrop. I was a kid in the candy store!

"Early in my visit, I was reminded once again that the basics of outdoor photography are applicable anywhere. Composition is critical and good exposure almost as important. I also found that my filters would play the same essential role here as in our national parks.

"I approached the skyline sunrise (above) feeling the familiar impulse to eliminate the clutter and find the patterns and shapes that would add clarity -- just as I would for any of my western landscape compositions. As I watched this early morning sunrise with a full moon setting from the Brooklyn Promenade, I felt as though we had the entire city to ourselves! Quiet and somewhat cold at 38 degrees, the harbor was still and the moonset pristine. Feeling the history of this place prompted me to set the tall ships in the foreground. With the moon falling quickly, I knew a fast shutter speed was necessary. I chose the longest lens I could fit into my backpack: a Canon 70-200mm f/2.8 IS with a 1.4 extender. In a situation like this, the filter factor of the Singh-Ray ColorCombo -- with its built-in polarizer -- would require a slower exposure that would have rendered the moon as an oval blur. Fortunately, I was able to use my Singh-Ray Color Intensifier with its minimal filter factor (about half an f-stop) to achieve a faster shutter speed and make this sharper image possible. While the Color Intensifier enhanced the natural color of the reflected light, my 4-stop soft-step ND Grad kept the craters in the moon clearly visible.

"This view of Grand Central Station reflects the influence of seeing so many impressive black and white photographs of the old Penn Central Station. Tragically, that 'cathedral' was torn down in favor of today's Madison Square Garden sports arena. For residents of the city, Grand Central Station is their post office and the terminal is their transportation hub. In choosing a vantage point for this image, I wanted to show the 'hum" of the people in this grand and ever-changing environment. After deciding to use my Canon 24mm f/3.5 Tilt/Shift lens to bring symmetry to both the frame and straighten the structural lines vertically, I settled on a slower shutter speed that would render some of the faster moving travelers as ghostly blurs. This was accomplished by using the Singh-Ray ColorCombo. In this case there was no light to be polarized, but the additional filter factor gave me the slower shutter speed I wanted and warmed the light at the same time. Balancing the wide difference in exposure levels was a challenge. The windows near the ceiling read almost seven stops brighter than the shadow areas. A 4-stop hard-step ND Grad held the exposure from the top lights to the top of the image. All that was left was to wait and choose the traffic pattern I wanted for the image.

"Properly exposing this waterfront image was another challenge. The motion implied by the boat was needed to lead the eye toward the primary focal point which is the reflected light on the building windows. I began by finding a shutter speed quick enough to freeze the moving boat and then choose f/11 as an aperture small enough to assure good overall depth of field with the Tilt/Shift lens. To achieve the right combination of 1/500 at f/11, I grudgingly selected an ISO setting of 800. Next was the selection of the Singh-Ray ColorCombo to both increase the color saturation and, more importantly, cut the glare. However this left the water a deep shadow. This was corrected by increasing the exposure 1 2/3 stops and inserting a 4-stop hard-step ND Grad all the way down to the waterline. Now, looking at the image with everything aglow and the exposure levels more evenly balanced across the entire frame, it looks like an easy shot.

"A 'must see' tourist attraction, the Empire State Building allows a good view of almost everywhere. With no tripods allowed, my inclination was to leave the photo gear in the vehicle. After a few moments' thought, that idea was dismissed for many reasons, and I figured I was just going to carry it as one might through an airport. Actually, the security both here and at the Statue of Liberty/Ellis Island is the same as it was at the airport! In the end I was glad I had it. Wherever I went, I found myself hand holding my image stabilized 70-200 while standing shoulder-to-shoulder with about 400 of my new and closest friends! As the light faded into a great sunset, motionless images became almost impossible. This situation was the best case I could ever make for owning the Singh-Ray Color Intensifier. Any other filter would have created impossibly slow shutter speeds. With little or no filter factor to worry about, I used it for every frame until the light was gone!


"Here again it was deja vu. I've viewed hundreds of images of the Flat Iron Building done by the masters ever since the days when this beautiful structure was the tallest skyscraper in Manhattan. Since I expected the light to play a major role in this first-light situation, it was pretty much a landscape photographer's mindset from the beginning. My preconception, however, did not hold up when the light came forth, and so the creative process took over. The composition was adjusted when I discovered a lot of open space at the foot of the building across the intersection. I just could not find a location in the pre-dawn that satisfied me. Instead, I set up where the bottom of the building was obscured by hedges and trees and made a frame from the tree branches. To bring the vertical lines of the skyscraper into proper perspective I again used the 24mm Tilt/Shift. When first light did appear it became obvious that the front of the building, where light was needed most, would not materialize. I decided to use a ColorCombo to heighten the intensity of the greens and blues. The filter's polarizer helped boost the contrast just a touch in the clouds; I then 'painted' the tree leaves with my head lamp to give them more color and detail."

Now that Steve has returned to his Nevada homestead, he's preparing to lead workshops in Yosemite Valley - Feb. 15-19 and Death Valley - April 11-15. For more news and information about Steve's workshop schedule, visit his website and gallery.


Tuesday, October 18, 2011

From the Archive:
Tracking the "filter workflow" through a winter workshop in Yosemite Valley

At the 5 year mark of this blog, we are revisiting some of our most helpful instructional stories. Going back to March 2008, Steve Kossack describes his "Filter Workflow" in detail, as he evaluates different lighting situations and determines what will be the perfect combination of filters to help optimize his captured image.

When outdoor photographer Steve Kossack shoots in any location, he instinctively follows his "filter workflow." To help explain how it works, Steve offered these three images of an early-morning scene he recently visited with his annual Yosemite Valley winter workshop. "Once again," says Steve, "the endless photographic opportunities plus the exhilaration of being in such a magical place made for an unforgettable week. And because Yosemite is so magical, whenever we return to the locations we've visited in previous years, we find they are never the same.

"With a deep snowfall and the weather changing by the moment, even familiar and easy-to-get-to locations were neither," explains Steve. "Road construction prompted the closure of the north side road and forced us to take a short predawn hike to reach Valley View. We were well rewarded for the effort.

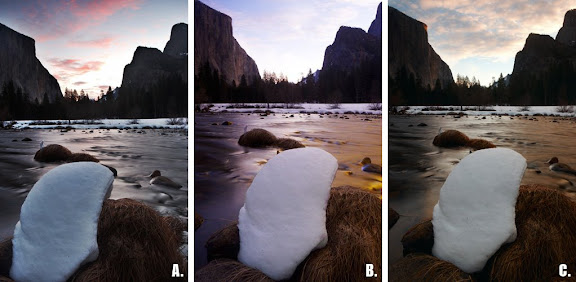
"While standing in the dark, after hiking through the knee-high snow pack down to the edge of the Merced River, we saw the clouds getting pinker in the light blue sky, but only for a few moments. (Frame A -- click image to enlarge.) Not certain how much detail could be recorded in the shadow areas, I positioned the camera down low and tilted forward to include as much of the foreground as possible. To emphasize the color in the sky, the LB Color Intensifier was selected along with a 2-stop soft-step Graduated Neutral Density filter to reduce the relative brightness of the sky. Because the exposure would be for several seconds, I did not want to extend it too much further. The modest filter factor of the "lighter, brighter" Color Intensifier cost me only about half an f-stop. It's surprising how often my filter workflow begins with trying the LB Color Intensifier for early morning light.

"Soon after the first shot -- with the color of the sky now faded and the scene before me gaining even more contrast -- everything became flat. The river had some reflected light on the far side but the shadow area of the water was now dark with no reflection. (Frame B.) In cases like this my filter choice is often the Gold-N-Blue Polarizer and 2 or 3-stop soft-step Graduated ND filter. Anytime there is no reflection in the shaded areas, I check to see if my Gold-N-Blue can help out. Of course you need light to create reflections and the orientation of the sun has to be right for a polarizer. I reframed the composition just slightly to limit the amount of now colorless sky and highlight the river. Here the balance of the blue to gold polarization helped accentuate the natural flow of the river. A 2-stop ND Grad was also used here.

"My third shot (Frame C.) at this location was taken as the first light of the day illuminated the tip of El Capitian. Here's where the LB ColorCombo became the right choice. This time, the reflections from the river were distracting the eye from the focal point and the ColorCombo's polarizing effect tamed this problem nicely. The added warmth of the color intensifying filter (an integral part of the combo) was also a welcomed effect. Adding a 3-stop hard-step ND grad was used to achieve the finished image.

"A few days into our winter workshop it became clear the Merced River -- which was now a calm reflecting pool in many places -- was presenting us with dramatic photo opportunities at almost every turn and bend. The opportunities, in fact, were sometimes overwhelming -- a situation I always welcome! My filter workflow enabled me to rationally concentrate the left side of my brain while the right side was joyfully experiencing the dramatic winter scenery.

"For this next scene, I choose to anchor the image on the left with the river bottom. The problem was that I could not see the river bottom in the reflection.

To help solve this and a few other problems, I chose the ColorCombo for several reasons. The first reason was the small bright green conifer at the top of the snow bank and its reflection in the still water. This green is what brought me to the composition in the first place. Whenever I see an important green element in a scene, my first thought is always the LB Color Intensifier or -- in this case -- the LB Color Combo which also provides 'lighter, brighter' polarization. To set the composition, I first found the best orientation for the polarizing filter by making my way down the snow bank to change the angle. Then a slight turn of the filter clearly revealed both the river bottom and the surface reflection. The polarizer was then fine tuned to cut the bright reflection off the snow as much as possible while still revealing the river bottom. Since the bright snow was such a major part of the composition, I realized it had to be exposed to capture both the overall scene and the detail in the white snow.

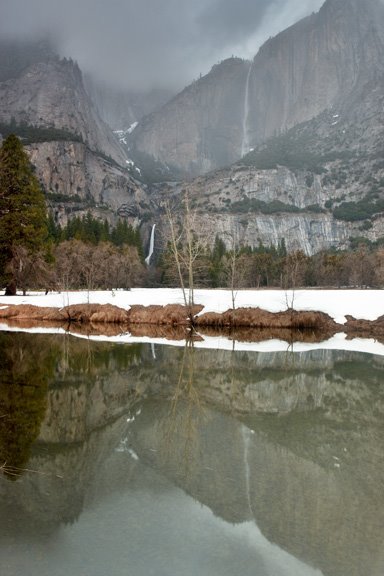
"For the stormy image of Yosemite Falls seen at left -- with its beautiful muted light -- you would think no filters would be needed, but this image is not quite as simple as it appears.

Rain was moving in and out as the falls drifted from view and then appeared again. This also obliterated the reflection in the water at times or made it dark and distant when it was visible. The colors were also very muted in the mist. My next workflow step was to try balancing the exposure to render the mid-tones a full stop brighter and accentuate the reflected image in the process. The only problem created by doing this was a very slow shutter speed that would have made the quick moving clouds, as well as the rain spattered river, too blurry. The next decision was to test the capability of my new Canon 1Ds MKIII at a higher ISO 800 setting while using a 3-stop soft-step Graduated ND filter. What was lost was some of the detail in the snow, but what was gained is a brighter reflection, a more realistic presentation of the falls and a recognizable cloud pattern that shows the passing storm’s movement.

For me, working through the filter workflow process is both fun and productive. I should add that I always expose a 'reference" frame without any filters to provide a basis for later review. In the end, there are always choices to be made between the variously filtered images. I can’t help but feel that is always a good thing!"

For more information about Steve's work, videos and workshops, visit his website.
Tuesday, October 4, 2011

Steve Kossack's new location moves him closer to his two favorite national parks

"I've just visited two of my most favorite National Parks now that they are closer than ever," says Steve Kossack from his new office and residence in Las Vegas, Nevada. "When I first moved to the deserts of Arizona ten years ago, I considered Page AZ but did not move there. Instead I went a couple of hundred miles south to the small town of Cottonwood, about 100 miles north of Phoenix. For more than a decade, Phoenix served as a terrific base for conducting my various photo workshops throughout the western states. I enjoyed great access to the south rim of The Grand Canyon with the Navajo nation and all of Utah's parks close by.

"Now that I have moved to Las Vegas, Nevada, I find myself halfway between my two most favorite national parks. Six hours to the north is the Grand Canyon. Yosemite is just six hours to the west. That means both are virtually right in my backyard. I first visited the North Rim, then I went west across the deserts of Nevada to Yosemite. Fall was in the air, but the color had not yet changed. The Canyon was mostly quiet after the tourist season and the weather was mild. In Yosemite we closed two of the High Sierra camps. Both visits were great opportunities to celebrate my relocation!

"Photographing the Grand Canyon felt like visiting an old friend. It was a time to relax -- knowing that whatever happens next will be enjoyable on several levels. I find tranquility in setting up an image where I've previously made some fine images. I'm seldom disappointed photographically and even when I walk away empty handed, I revel in the experience of just being there! The image above was taken from the north rim of the canyon which has an elevation that's over a thousand feet higher than the south rim and the rock formations are so much closer. Nowhere are both rims more in play than here at Cape Royal. From this point above the dramatic setting, it is easy to set up an image that has converging lines that parallel the rim to the south. This gives a flow to the composition that is simply majestic to me! In the past I've been fortunate enough to capture two images from this location that I have framed to hang in my home. Maybe this one will be number three? I used a Singh-Ray Color Intensifier along with a 4-stop hard-step ND Grad.

"This sunrise image from the north rim was an unexpected gift! I was out looking for first light on Mt. Hayden, but the cloud cover that morning prevented it. Over my shoulder I had been watching the changing colors in the sky for more than half an hour when suddenly the rising sun lifted into the cloud formation thus giving even light to the canyon below. Setting up my composition as fast as possible to show the ledges leading into the canyon, I was only able to capture two frames before this image was gone. The use of a 3-stop Reverse ND was the key to holding the exposure of the light rays below the clouds. I also used a ColorCombo and a 4-stop hard-step ND Grad.

"On my trip to Yosemite, I was able to make the last few days of the season at two of my favorite Sierra high camps. Both the Glen Aulin and the May Lake high camps offer different and unique photo opportunities. This view of Glen Aulen never disappoints me. It's located at the mouth of the Grand Canyon of the Tuolumne River. This late in the season, the orientation of the light was much different and offered beautiful sidelight on the canyon rim. The magic light that appears in this image turned the clouds a crimson wonder. Using a ColorCombo and a 4-stop soft-step ND Grad, my exposure was for 10 seconds at f/16. With the future of the Glen Aulin high camp in jeopardy due to the drain field runoff into the river, each visit here becomes even more special. I happily add this image to my portfolio with hopes of capturing more in the future.

"I've shot this scene at May Lake many times, but this was only the second opportunity I've had to photograph the scene with Mt. Hoffman reflected so clearly in the perfectly still water! The reflection was a rare treat but it presented a couple of problems. First and most important was the fact that I have, for years, considered my previous reflected image from this spot to be about as good as I know how to make -- both compositionally and technically. But in my heart of hearts I always hope this is not true. But what to do now? I was also limited in what tools I had with me. Backpacking only allows for limited photo gear. If I wanted to take advantage of the three-quarter moon setting, I needed to widen the composition a lot. Including the reflection would help immensely here. The long 20-second shutter setting would render the moon oblong. It's moving! I had two lenses in my pack. One of them was my Canon 20mm 2.8. Perfect! I used a 4-stop hard-step ND Grad to balance the exposure."

Steve continues to polish his website to make it more convenient for visitors to browse his gallery and keep up on the latest information. As the result of his new location in Las Vegas, he expects to be adding several more workshops for the coming year.