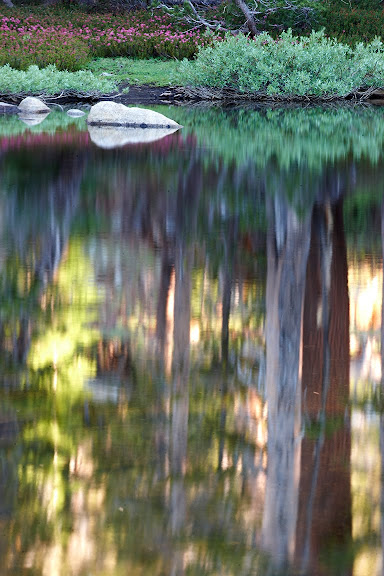
Veteran landscape photographer Steve Kossack has successfully led many workshops through some very challenging weather conditions. "We almost always get our share of great light -- most often at the beginning or the end of the day -- no matter what time of year or location we're visiting. But we all realize there will also be those really challenging times when we need to work with the light we're given. That's often when we learn the most. The best solution I have found for the lack of 'good light' is stronger composition and more creative selection of subject matter. That's why reflected images are a big part of my approach to overcoming poor lighting conditions in my nature and landscape photographs.
"The well-framed reflection adds depth and scale to an image. To be honest, reflections are such a strong element for me that I actually seek them out. There are, however, several basic facts I keep in mind as I photograph reflections. First, the mirrored image will not usually serve effectively as a strong focal point, although it will lead the eye in that direction. I also try to keep the composition as uncluttered as possible -- realizing that almost any mirrored image will tend to be very busy to start with. When I'm showing both the focal point and the mirrored image in the composition, then I keep the exposure darker in the reflection. When using my ND Grads, I'm especially careful that I don't hold back so much of the background exposure that the reflected image appears brighter than the scene itself -- an effect almost never found in the real world.
"When composing the scene above -- with the shoreline in shadow and the very bright, almost blown-out reflected light from the sky -- I realized that the shaded green was rendered dull. My LB ColorCombo helped increase the intensity of the green and provided a slower shutter speed to slightly blur the moving water. The reflected portion in this image was a far stronger element, so I composed the image to hide the fact that there was not much green above the water. Since the focal point was going to be the shoreline, about two thirds of the way into the composition, I took care not to overexpose the reflected portion and thereby risk that the eye would not get there! Remembering that the reflection must be darker than what is reflected took care of this problem. Now all that was needed was a slow shutter speed to add a touch of blur. My 4-stop hard-step Graduated Neutral Density filter held back the reflection as the LB ColorCombo filter increased the color contrast and saturation. Looking for deeper saturation? Nature always provides it in the reflected image!
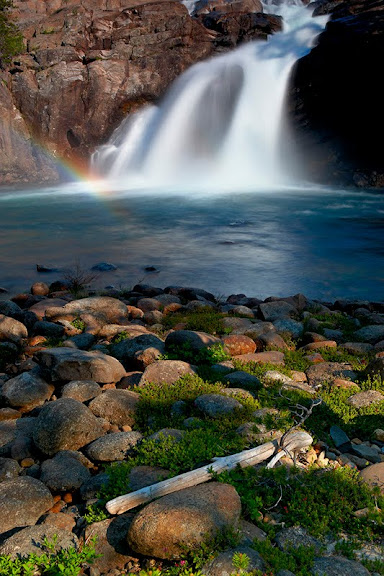
"In this next image, the rainbow in the cascade was all but invisible before I placed the new Singh-Ray Vari-N-Trio on my lens. That's when the highlighted green on the rocks of the shoreline plants also jumped to life! The success of this image started with the intensification of the earth tones and continued with the polarization that reduced the glare from the rocks and helped accentuate both the rainbow and the foreground. The third and final effect produced by the Trio was to slow the exposure to blur the cascade just enough to hold detail in the water and create the backdrop that would help make the rainbow more prominent.
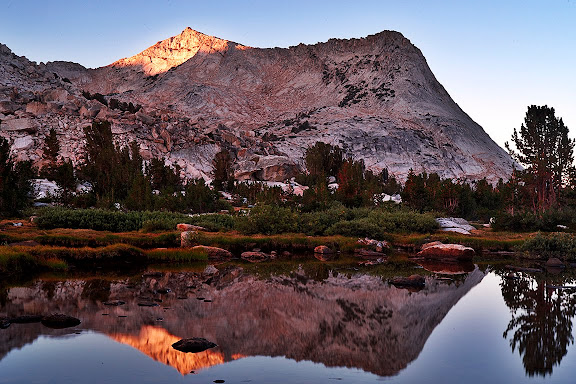
"Here's a classic example of seeing-- yet not really seeing-- the green trees that show life contrasted against the mostly sterile high-country granite of Yosemite's Vogelsang Peak. The use of the ColorCombo here brought the reflection to life and the deep green of the forest color became rich and saturated instead of muted and murky. In this composition, I was careful to anchor the rock in the lake in order to lend a helping hand to the reflection. Exposure was going to be a problem, but I realized that if I kept the mirrored portion darker, I could use my 3-stop soft-step ND Grad and just let the shadows fall where they may.
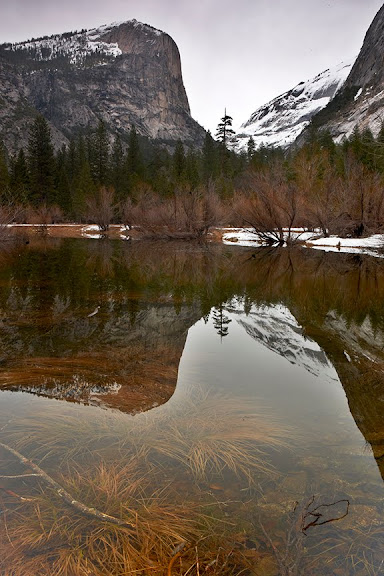
"When capturing this image of Yosemite's Mount Watkins reflected in Mirror Lake, a ColorCombo helped in two important ways. The filter's built-in polarizer allowed me to control the amount of visibility under the surface of the water, which was important to tell the story of the downed limbs and the passing of another season into winter. Showing that life will endure until next spring was also achieved by intensifying the green of the distant evergreens. Balancing the exposure was a very important part of this composition. Confronted with a blustery, washed-out sky, the white detail of the snow-covered granite was easily lost. The saturation of the green trees, especially in the reflection, helped to mask this problem. Knowing I would be measuring success by the exposure of these trees, I based my meter reading on them and opened up another stop to give detail. I then added a 3-stop soft-step ND Grad to separate the snow-covered granite from the sky.
"Water is never motionless! Even if it's in a stagnant pool, water has some motion that I usually want to show. A slight touch of motion blur adds to the 'feeling' of water, and a slow exposure is one of the best tools I have for producing such a blur. Starting at 1/8 sec. for slow-moving water, and then increasing my shutter speed accordingly -- sometimes up to 1/500 sec. for big waterfalls -- lets me create a series of variations I can review later in post production. Slowing the shutter speed to a second or more changes the effect dramatically."
Steve is currently making arrangements for a number of workshops, including a trip to Yosemite in February and two in March to Death Valley. For more information and images of many other recent outings, stop by his website and check out his workshop schedule.
Friday, December 17, 2010
Tuesday, November 23, 2010
For the photographer looking for a worthy challenge, Steve Kossack suggests taking on Big Bend
Veteran landscape photographer Steve Kossack recently conducted a five-day workshop in Big Bend National and State Parks along the Texas Rio Grande. "The state park follows the river to the west almost to the town of Presidio and provides much more access to the river than does the national park. The towns of Terlinqua and Lajatis provide culture and atmosphere that add a tremendous feel for the area in general.
"In today's climate of fear and hostility towards our neighbors to the south, there is little evidence of obvious tension other than maybe an increased number of border patrol vehicles in the park, and this is still only evident sporadically. All this had no impact whatsoever on our scouting trips or the actual workshop experience this year in the park. The greatest challenge for the outdoor photographer in Big Bend is probably the diversity of the landscape itself and how to photograph it! There aren't really any big 'E-Ticket' attractions. No Half Dome or Old Faithful's here. Nothing on the maps or brochures screaming, 'Be here tomorrow morning and bring your photo gear!' It's a land of contradictions. The beauty is distant and at the same time, at your feet -- and in your face! It's hostile and tranquil as well; and the flavor is hot (both in climate and food) and cool (as the distant sunsets take on a blue color cast). The landscape is flat and then jumps out towards the sky, and the sky is crystal blue and fire red! A river runs through it and a mountain range crowns it. At first glance this landscape might be described as underwhelming. But on the contrary, I found it more like overwhelming! And I found myself working hard to stay in the game. My hope was that some of my images would portray some of these things.
"The image at the top of this story was captured at sunset at Sotol Vista, a vast area that's one of the park's scenic highlights. To me, this view is Big Bend. We are focusing into Mexico! The distant canyons are the ones we were visiting and photographing just a day or so earlier. Huge and dominant, they now seem little more than a notch in the far distance. As the light started to fade, the sun was setting in the direction I wanted to detail. This was not to be an easy task. The unavoidable lens flare would either need to be included as part of the image or another composition at a different angle would need to be found quickly. I wanted the drama that the setting sun created, so I decided to fight instead of quit! Using one of the pouches that my Singh-Ray filters come in, I shaded the lens as much as possible while holding the actual filter in front of the lens. This caused some shaking of heads and some laughter among our workshop participants. Fortunately, most were busy with their own challenges, so I escaped serious humiliation. The image shown was produced with the LB ColorCombo and 4-stop hard-step ND Grad.
"This hillside pass in the Big Bend State Park is the steepest grade in Texas and gives a great perspective to the Rio Grande fading into the distance. If the vista from Sotol is the heart of the park, then this is its soul. On the left is Mexico across the river for as far as the eye can see. This quiet wilderness along our border is one aspect of Big Bend we don't often think of. Here again the almost impossible exposure problem was again solved the same way as before. After photographing the scene for over an hour, the shadows were fading quite dramatically and the orientation of the sun became an even bigger problem to solve. Throughout the shoot I kept changing filters. At first in the brighter light, I was using the ColorCombo and a 2-stop soft-step ND Grad. After the direct light had gone, I eventually captured this image by switching to the Color Intensifier and stacking my 3-stop soft-step and 4-stop hard-step ND Grad to render both the color and sky correctly and bring up some detail in the canyon.
"My goal for this image of the hoodoos was to portray the rugged and vast solitude bathed in glorious morning light. As I was coming up to this moon-like terrain in the dark, I felt the need to tell the story of this place with a vast, wide-angle view. After exploring various compositional options, I set to work trying to express that original impulse. The problems to be solved here were many! The foreground was a jumble of eroding sandstone on hillsides strewn with boulders and cactus. Most of the interesting rock formations were small. The 6,000-foot-plus Chisos Mountain range that I first viewed as a focal point were now just a distant ridge if I stayed with my composition.
"The solution was found in using a 24mm tilt/shift lens that helped with all this. The perspective was changed to bring the very small rock formation within just a few inches of the camera, so they could be seen clearly in the immediate foreground -- more upright and bigger. This composition now hid the distance between the shadowed foreground and sunlit background to give the feeling of infinity to the mountains some 10 miles away! Exposure was critical. Too much exposure in the foreground would create an unnatural look; too little would not show the detail I was seeing. I waited for the direct light to hit the left hoodoo giving balance to the one further in the distance on the right. I worked quickly at this point using the ColorCombo and 4-stop Hard-Step ND Grad.
"Here's one of my personal favorites from this trip because it is so different from any other images we captured. Yes, for me, emotion has a great influence on what I will do in any given situation. On the last morning of our workshop we all took up the challenge of a one-mile uphill hike in the dark to a ridge that gave us a view from a direction completely different from any we experienced on our five day outing. This panorama not only stretched all the way to the Sierra Del Carmen mountain range in Mexico, but it also provided us the rolling green gulches of the Chisos mountains at 6,000 feet, This viewpoint had it all. The mountains and deserts, the glow of the morning sky, and the windswept canyons. Foremost among these features was the lush green of the canyon foliage. Green is a dark color that hides in shadows because it does not reflect light. It is also a difficult color to manipulate in post-processing. In this case, our difficulties were further heightened by a soft breeze that made movement yet another problem. The LB Color Intensifier was chosen since it has only a 2/3-stop filter factor which allowed me to use a faster shutter setting. I then added my 4-stop soft-step ND Grad to balance the light in the sky with that on the foreground."
Steve is currently planning trips to Yosemite in February and Death Valley in March. For more information and images of Big Bend stop by his website and check out his workshop schedule.
Tuesday, June 22, 2010
Photographing along the trails through Big Bend Country is a unique visual adventure
Where do I go next? That's a question all photographers ask themselves repeatedly. It's also the question that keeps a veteran photographer like Steve Kossack scouting out new places to lead future workshops.
"This time I decided to go back to Big Bend National Park," says Steve. "I was last there in 1898... or maybe it was 1998... What I do remember from those earlier visits is how different it is from any other National Park and how much there is to see all along the trails. Even so, when I returned this spring, I found the raw beauty of this country to be even more impressive than I expected. It's truly one of the last remaining wild corners of the United States.
"As I explored the park in preparation for my workshop this fall, I could feel the anticipation of images just waiting to be found, or is it images waiting to find me? Anyway, the photo opportunities proved to be exciting and enticing. Located on the Mexican border along the Rio Grande in southwest Texas, this place is not close to anything -- which adds immensely to the atmosphere and adventurous experience. Big Bend is 200 miles from the interstate!
"Big Bend gets its name, of course, because the Rio Grande makes a big bend (90° turn) as it flows through the area. The river also marks the border between the U.S. and Mexico. But before you reach the river on your way south, there is a mountain range floating in the vast desert. These are the Chisos Mountains and one of the major landmarks of the park. In the image (above), the vast distances between the mountain tops are compressed by the 300mm lens. The morning light was soft enough to render the shadows in some detail and the use of stacked Graduated ND filters (3-stop soft-step for the sky and 2-stop hard-step for the mid mountains) complemented the drop-in LB ColorCombo. The warm tones of the left shoulder that brought the image to life are the result of the ColorCombo's polarizer.
"Storms or fog banks are sometimes present in the Chisos. This makes for dramatic images. But as soon as they are gone the scene is entirely different. To capture the moment when the cloud bank is just beginning to fade into the distance was exhilarating! Here the use of a 4-stop hard-step ND Grad provided the contrast and definition I needed to 'set the table' for the rest of the composition. The light rock in the foreground was what I wanted for the 'tablecloth' and I had to hustle into position before the distant cloud lifted in the fading light. Several exposures were made with a 2-stop soft-step and a 3-stop hard-step ND Grad along with the ColorCombo on all frames. The frame shown here gave me the best rendering of the fading clouds.
"This image of the distant mountain range seeming to float upon a vast desert was the story I wanted to tell. The morning light on the Chisos range was not dominant but it directed attention on the hoodoos in the foreground. The angle of light created deep shadows and glare which the ColorCombo helped reduce. Hiding the gradient line of the 3-stop soft-step ND Grad was difficult and made the exposure of many frames important. The movement of the clouds gave motion heading out of the frame to the right and the longer the exposure the better I liked the result. In the low early morning light there was no need for the Vari-ND, but it was a thought!
"These are badlands! This image of Santa Elena Canyon was captured at dawn. This far south, the Rio Grande has no water coming in from the U.S. side -- and only a little bit from Mexico -- which makes this dry and arid place seem even more so. I wanted this composition to help tell that story.
"I separated the main focal point, which is the scarceness of the river appearing or disappearing in the huge canyon. The use of a tilt/shift lens accentuates this and anytime I see green as the dominate color I reach for my LB Color Intensifier or ColorCombo. A slight breeze was causing the ocotillo cactus in the foreground to sway. This made it important to keep the exposure as short as possible. Since the LB Intensifier has almost no filter factor, it allowed me to use a much quicker shutter speed! Although there was nothing of interest in the sky, it was needed as part of the composition. I used a 3-stop soft-step ND Grad to help balance the exposure and set off the glow of the morning light on the face of the Canyon.
This is the huge entrance to one of the huge canyons of Big Bend National Park. By the subtle use of my Gold-N-Blue Polarizer in the pre-dawn light, I was able to accentuate the reflecting glow off the water. Of course one wall of this canyon is in another country and the remote location of this awesome scene only added to the unique experience. We have now closed the border crossings that used to be so much a part of that experience along the Big Bend. The town of Boquillas is now off limits from the U.S. side. Many of the town's residents, eager to offer their goods and a glimpse into their culture and customs, are prohibited from doing so. Since the river is shallow and easily crossed they still come across under threat of arrest and leave their offerings on the U.S. side for donations. Talking (sometimes shouting) with them is all we can do at the moment. The park service is hoping this situation will change again in the near future.
"This trip to Big Bend has refreshed my appreciation for taking new trails from time to time. I can fully recommend a visit to Big Bend Country for any photographer who's wondering where to go next."
You can get details about Steve's future schedule of workshops by visiting his website. Don't forget to visit his new gallery while you're there.
Tuesday, April 13, 2010
Viewed through the photographic eye of a fervent admirer, Death Valley comes to life
"No one in the famous William Lewis Manley expedition of 1849 actually died after being dangerously stranded and then rescued," Steve Kossack tells his photo workshop participants 160 years later; "but as one of the women looked back from her departing wagon she exclaimed, 'Goodbye Death Valley.' The thought that their near-death experience would bring an official name to our youngest U.S. National Park was, I'm sure, the furthest thing from their minds at the time.
"Every time I visit this magnificent valley, I'm as happy to be there as those first visitors were to leave it! This is the place that first inspired me to pursue the art of photography many years ago. However, when I finally decided I wanted to photograph Death Valley, I discovered very quickly I lacked the skill. As my study of photography advanced, this is the place I kept coming back to -- trying over and over to make lasting images. This is also the place where my first workshop took place. In recent years, I've done as many as three in a month! Every season in Death Valley is a different experience of sorts. It's a truly wondrous and mystical place to explore and photograph. It continuously challenges my mind and my filter pack! Spring is the time I like best, and our recent March workshop was especially enjoyable!
"Photographing in the Mesquite Dunes (above) is a highlight of every workshop. Actually being 'out there' in the dunes is a much different feeling than photographing from a safe roadside vantage point. 'Showtime' is how I describe those moments when first or last light of the day turns the dunes into a magical fantasy land of shapes, textures and colors. As our group set up on this clear spring pre-dawn, we began talking about what was to come at first light and we experimented with a combination of lenses and compositions. As the light became defused by a small cloud on the horizon, I commented on the purple mountains behind the dunes and quickly replaced my Singh-Ray LB Warming Polarizer with the Gold-N-Blue Polarizer. Then I shot this exposure and quickly bracketed two more exposures at 1/3 and 2/3 f-stop under that exposure. Then I exposed three more bracketed exposures after adding a 3-stop soft-step ND Grad to reduce the tone of the mountains. I then forgot all about this image until I saw it again in the raw converter. A nice surprise, indeed!
"I've found that most of my workshop participants usually spend the evening following our first dunes shoot hoping for winds strong enough to cover the previous days footprints. They are also dismayed at the sight of approaching hikers and photographers the next morning who might intrude on their composition. I have, however, concluded that I may want to include them in my composition. People show size, scale and scope. It's difficult to show these dunes in a way that conveys the landscape proportionally. There are three elements that can help -- if and when I can find them. One is shrubery. This helps because they are usually closer. Next are the mountains behind the dunes. If you compress them with a longer lens you'll have more detail. This can help to tell the story of the dune's actual size. But by far the best element for me is people. They can immediately set the stage!
"The bright sky in this image was almost a washout in the early morning sidelight. An LB Warming Polarizer helped reduce the glare from both the sky and sand. It also cut the haze of the distant mountain range. A 4-stop hard-step ND Grad helped keep the sky and mountain range exposure manageable and created enough contrast to accentuate our dune walker. In retrospect, I feel this shot is the perfect counterpart to the image at the top of our story."
"This view from Aguereberry Point (above) and the following view from Dante's Peak face each other from opposite sides of Death Valley at an elevation of over one mile above the valley floor. In addition to the breathtaking panoramic views from these two sides, visitors experience a noticeable drop in temperature from the valley floor. At most times of the year, a 30-degree difference is the norm and since both vista points are on high cliff areas unprotected for hundreds of miles in some directions, wind is a constant feature. Aguereberry Point offers photographers some terrific foreground shrub and rock formations and the mountains run parallel to the valley, providing a dramatic setting especially with the last direct light of the day. Earlier this evening we had hoped to get a look at the rising full moon at sunset, but the cloud cover on the eastern horizon did not cooperate. For a while it did not look good photographically. We waited, however, and were well rewarded for our patience.
"Although this view from Dante's Peak features the same area of the valley from the opposite direction, this wide, spread-out expanse is much more difficult to shoot than the Aguereberry image. This view presents a vast panorama that some might consider as little more than sightseeing! However, the color that appeared just after sunrise quickly made it much more exciting. I was concerned, however, that the constant 40-mph wind would make it impossible to get a sharp image. I also felt something was needed to provide scope and scale in the foreground but I could not find any rock formations to feature. As the color in the clouds just kept getting better and better, I decided to try timing my shots to take advantage of any lull in the sometimes gale force wind. With the morning light steadily increasing, I moved in behind a large shrub that seemed to be withstanding the wind somewhat better than smaller ones. I raised the ISO on my Canon 1Ds MKlll to 1000! I figured that with the blowing dust in the valley, infinity was going to look like sensor noise anyway. Trying to time the wind gusts -- which never slowed much during our 45-minute effort -- I just kept shooting continually. The frame shown here was one of the few usable ones. I used my Singh-Ray LB Color Intensifier for this image. I always keep this filter at my side to shoot scenes of this sort, where I can't afford to lose much shutter speed. In fact, the LB Color Intensifer the only filter I have that requires less than one additional f-stop. I also alternated between my 3 and 4-stop hard-step ND grads during the shoot.
"Visitors to the famous dry lake bed, or playa, known as the Racetrack regard the mysterious sliding rocks as a great visual attraction, but the main attraction for me is the vast beauty of the playa and the valley it sits in. Nevertheless, I always go out and shoot the sliding rocks like everyone else! There seem to be at least three distinctly different images that can be made there. The first is in direct, low sidelight that is present upon arrival -- usually in the afternoon. This sidelight casts great shadows on the ridges left by the sliding rocks and accentuates the deep rut. It also gives good light to the surrounding mountains and gives evenly strong light to the playa as well. This first shot allows time to get use to the phenomena of the moving rocks and concentrate on composition. It also allows time to walk this broad deceptively huge area looking for the best 'sliders.'
"The second and third photo opportunities -- which occur usually about 45 minutes before actual sunset -- are more subtle and harder to accomplish. After the direct light has been blocked by the mountains, the playa goes into shadow as do all the west facing ridges and eventually a bright sky is left with a huge contrast everywhere else. This is the time that I shoot only the sliding rocks and tracks for detail. If conditions are right the last light of the day will put on a show over the playa. This is the time I like the best! The difficulty is the huge difference between the sky and rocks. The playa will eventually reflect the color in the sky and the trick is to hold an exposure that will render the surrounding shaded mountains in some detail. Here's how I made this image. A Canon 24mm tilt/shift lens was set to give just enough height above the rock (the tripod was at ground level) to create that 'screeching to a halt' effect. The mountain range was then brought back into perspective with a slight forward tilt of the lens. My Canon angle finder C was used to see through the viewfinder. I also used the LB ColorCombo, making sure I did not over-polarize the sky. I then experimented with various ND grads, as each mountain range has a different exposure reading, and I knew that the key would lie in a getting a correct exposure for them. In the end, I had quite a few good exposures to choose from."
Steve has just opened his newly designed website, which feature images by a number of his workshop participants. You can also learn more about joining Steve's upcoming workshops in Glacier National Park this July or the Yosemite High Country in August.
Friday, March 19, 2010
Winter in Yosemite workshoppers find some new challenges and many beautiful surprises
The 400-plus miles of interstate highway between Steve Kossack's home in Cottonwood, Arizona, and California's Yosemite National Park is always paved with high expectations and lasting memories. "Yosemite is for me a walk among the giants, figuratively and literally, and the Yosemite Valley is especially magical. I'm never short on inspiration when I'm there in what some of us call 'the best seven square miles on the planet.' Any season is the right season to be photographing in Yosemite, but it always presents some special challenges. We encountered several interesting ones during our workshop in February.
"This sunset view of the Yosemite Valley was a challenging exposure to say the least! I took a guess at seven to nine stops of light difference between the bright overhead sky and the shaded trees in the foreground. I was primarily concerned about properly exposing the lovely light on the 3,000-foot granite face of El Capitan seen on the left.
"Although I worked this scene continuously for over 45 minutes, in the end I only had 3 images that had the light evenly balanced across the entire frame as needed. Most of the the exposure challenges were addressed by combining four Singh-Ray filters. First a 4-stop hard-step Graduated ND helped subdue the very bright sky exposure, but I still needed to further subdue the light on the valley areas beyond the ridges. Next was the addition of a 3-stop Reverse ND Grad to further reduce the exposure of the highlighted El Capitian on the left of the frame. This unique filter is designed with its heaviest gradient density close to the filter's center, which was just what was needed here. Because I wanted to reveal even more detail in the foreground shadows, I added a 2-stop soft-step ND Grad which increased the exposure by 2 more f-stops, giving me enough exposure to record the deep foreground of the forest floor. Finally, the overall color was helped along by the use of the LB Color Intensifier. Yes, it was a long way to go, but I think the result was well worth the additional time and effort.
"This image also deserved a lot of help -- in terms of both its composition and exposure technique. The sky was nearly as white as the snow cover on the mountain. The reflected image in the foreground was the main feature in this image and I chose to adjust my LB Warming Polarizer to cut through the reflection just enough to reveal the pine needles under the water's surface. Without any detail to speak of in the sky, the foreground had to carry the composition. Working with the subdued skylight that I refer to as 'nature's soft box,' the challenge as I saw it was to keep the reflected image of the mountains dominant and compensate for the lost detail in the sky by finding an exposure that would convey the feeling of the approaching storm. That was achieved by metering directly off the sky. In short, I needed to create a feeling that I could sense but not see. The sky and snow cover were held back with a 4-stop soft-step Graduated ND filter which gave a much brighter view of the row of trees in the middle ground. I experimented with both the Gold-N-Blue Polarizer as well as the ColorCombo with some success as well, and I have good frames taken with each. It was clear, however, that the LB Warming Polarizer produced the best results by saturating the earth tones while providing the desired effect in the reflection.
"White snow... blue sky. It was an age-old challenge made even tougher by the direct light of the rising sun reflecting off the granite cliffs above. A heart-stopping scene to be sure, but a perplexing one as well. I thought a composition without the highlighted granite would be too confining and would not give the eye a place to land. To maximize the effect of this dramatic composition, I realized the exposure would be the real challenge. The solution began with applying the old rule of overexposing snow two-plus stops for a nice white tone. (If you don't over-ride the meter, the camera will see white as 18% gray and that's exactly what it will be in the image... gray!) Next was the choice of a 4-stop hard-step ND Grad and then -- after looking at my histogram -- adding a 2-stop, soft-step ND Grad. I like the effect I get by stacking hard-step and soft-step filters which slightly softens the gradient line. To compensate for the filters, I then opened up 2 more stops. In the image shown here, I added the LB ColorCombo to enrich the glow of the granite. Although the Warming Polarizer was also used in different frames, I liked the heightened earth tones and thought the reflected blue of the sky gave presence to the chill of this cold winter day.
"As the face of upper Yosemite Falls in the background became bathed in the golden glow of morning light, the shadowed areas -- which in this composition are dominant -- took on a huge, blue color cast due to the reflective light of the Sierra blue sky. A warming filter was an obvious choice, but with the Singh-Ray Warming Polarizer, I could also control the amount of reflection and still reveal the texture of the river bed in the foreground. The use of a 3-stop, soft-step ND Grad helped raise the exposure in the shadows to more accurately render the snow covered trees as well. The real key here was the sky -- although they are a seemingly small part of the image, the wispy cloud streaks were there like arrows pointing directly to the trees. If it were just about the falls this would have been a completely different composition. With the light changing very fast I went through the ND Grad possibilities to pick the best balanced image to work with in post processing. In the image shown here, I decided that an almost balanced exposure between the falls and its reflection gave the best rendering of the shadowed trees. In most cases, this would have provided an unnatural effect -- something not possible in nature. Here it worked!
"Here's a favorite trick of mine. Coming across a scene I've photographed many times before -- such as this one -- only to discover that the river now was moving so fast that I could not see the mirror-like reflection I was expecting. What there was of the reflection was muted and dull. The Vari-N-Duo to the rescue! I've learned that, by slowing the exposure time considerably, I can smooth out the movement of the current and create a much calmer mood, or at least different look. This image is a 30-second exposure using the Vari-N-Duo which produced a pronounced muted glow. The polarizer built into this filter is a great help in eliminating the stacking of filters. The reflecting glare has been cut back and the shadows warmed. A 3-stop hard-step ND Grad allowed the river's reflection to be increased by 2 stops."
If you'd like to learn more about joining the fun at one of Steve's upcoming workshops in Glacier National Park this July, or the Yosemite High Country in August, be sure to stop by his website for complete details.
Subscribe to:
Posts (Atom)