Since early July, when Master Photo Workshops released the 100-minute DVD featuring veteran landscape photographer and Singh-Ray blog contributor Steve Kossack, we've heard lots of positive feedback -- especially on his discussion about why certain images have become his favorites. So we asked Steve to review a few of the images made in the course of his demonstrations for the DVD. Here's what he had to say about the four images below.
"Well, I'll start by saying it was a fun trip for me -- doing an in-the-field workshop exclusively for the video team directed by Gregory McKean. We followed as our theme the DVD's title, Every Picture Tells a Story. So let's talk about the stories I tried to tell by these images produced in the process.
"If we believe in putting the horse before the cart, then we need to begin each photograph by asking -- and answering -- the question 'what is the story?' before deciding how we will say it. These are the two basic steps that prescribe every photograph I make. When I take my workshops into the field, I feel I am revealing a part of myself. It’s almost like asking 'how do you like my place?' Even if they like the location, the challenging part has just begun. I try to explain why I brought them to this place and how we can all go about setting the story of this place into pictures. Let's revisit four of the places featured in the video.
The Wave of Sandstone and Light
"Everyone should see and experience this amazing place in southern Utah called The Wave -- not just this spot but the entire area. With or without photo gear in hand, this is one of the great places anywhere on Earth. No matter how many times I’ve been here, it always holds the power to surprise and delight! The story here on this day was the light and the weather that created that light. This is a good place to be a couple hours after sunrise and to have patience if bad weather is passing through. By waiting for the shadows to deepen and the cloud pattern to open just above Top Rock pictured here in the middle distance, I set up my composition low and wide to show how I think the formation got its name and then opened the view even more to show the lines moving away. The Singh-Ray ColorCombo helped both the color saturation and contrast in the clouds. It also helped control the reflected glare in the highlights. A 3-stop soft-step ND Grad was used to balance the exposure in the shadows with the highlights on the right side and in the sky. I intentionally burned the left corner to aid the eye in finding Top Rock and the cloud opening quickly.
Coyote Buttes
"Telling the story of this place in the spectacular wilderness spanning the Utah-Arizona border is to follow the continuous surface erosion and its constant shifting through flash floods into the canyons and washes. A favorite topic of mine has always been the struggle for life that goes on here. In this case, it's been an unsuccessful struggle for the tree in the foreground. The story contains all the elements except the floods themselves, which I think adds both mystery and anticipation. In order to straighten the buttes overhead at this low angle, a Canon tilt/shift lens was used along with the ColorCombo to heighten contrast in the clouds. A 2-stop soft-step ND Grad was then placed in front of the ColorCombo to further balance the exposure. Of the various images taken during our DVD shoot, this one is perhaps the strongest of the storytellers.
Cactus amid the Color
"In the DVD we demonstrated how this image of a small subject in a small place was visualized and made. A simple scene to be sure, however achieving this image took some deep thought as well as trial and error. Looking at all the elements dictated a slow study of what those elements were and how to accentuate them. As we went through the filter kit trying to bring forward different parts of the 'life on the rocks' story, we discovered several possibilities. In this image, we finally came up with an added touch of contrasting color in the overhead rocks by polarizing the reflected light with the Gold-N-Blue Polarizer.
Horseshoe Bend in Another Light
"The DVD also includes a visit to this bend of the Colorado River that's long been an icon of the American Southwest. Having seen so many images of this spectacular scene for many years, visiting photographers can find our preconceptions of Horseshoe Bend to be both an advantage and disadvantage in terms of telling our own story of what we are suddenly seeing with our own eyes. In most pictures, the story involves not only the rhythmic bend of the river or how deep the canyon is, but also the continuous variations in weather, time of day and the ever-changing light that's not at all controllable.
"For me the weather and position of the sun on this day made the reflected blue light the key aspect of this story. The composition was adjusted to show more sky than I would usually include. This eliminated some of the foreground but I was careful not to exclude the rock faces that give the visual perspective needed for scale and scope. The clouds set up perfectly for counter balance. They appear to be moving left to right, which is usually the way we see, and the river appears to moving with them -- although, in reality, the river flows in the opposite direction and the clouds had very little movement and I realized the low light would end long before another composition was possible. Exposing for the water reflection was the main challenge. I balanced everything from there. An LB Color Intensifier was used in this frame to avoid losing the reflected blue from the water. I wanted to balance the cold blue with the warmth of the sunlit cliffs. A 4-stop, hard-step ND Grad was used to hold back both the sky and light of the cliffs in the distance."
You can see more of Steve's story-telling landscapes of the American West and check out his schedule of future workshops by visiting his website.
Tuesday, September 1, 2009
Tuesday, July 7, 2009
Conveying the emotion within an image calls for conscious control of the colors and light
As Arizona landscape photographer Steve Kossack prepares to lead his annual Yosemite high-camp backpack and workshop across 60 miles of rugged high-altitude trail, he's again feeling the inner excitement. "Once again," says Steve, "I'm feeling that compelling urge to photograph the wonders of nature. I'm always trying for images that convey my emotional response to the scenes before me. I find that it's never easy to put emotions into words -- let alone a photograph! However it's the emotional moments and places that are so special for me.
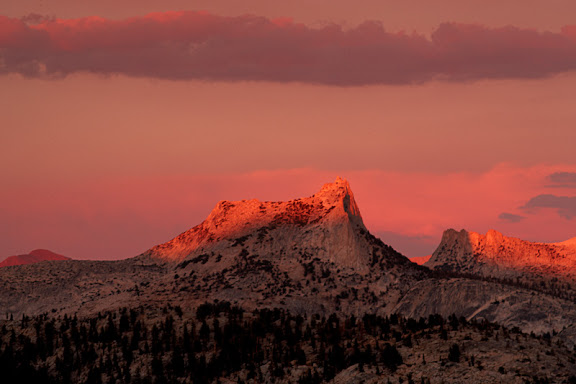
"The Sierra Nevada mountain range is famous for what is often called alpenglow -- a time when a layer of blue and magenta bands forms in the twilight sky at high altitudes. On most days you can see alpenglow even on cloudless evenings. I have learned not to walk away from a Sierra sunset until well after the light has faded to almost complete darkness.
"In capturing the dramatic alpenglow above Cathedral Peak in Yosemite National Park, a couple of problems were solved by the use of my Singh-Ray filters. The most obvious challenge was the deep and dark shadow that the bottom of the composition presented. The trees added to this because they were an element that I thought would be most important. I’m shooting from a position above tree line! I needed enough shadow detail to tell this story. If I exposed for the highlights and let the shadow go where it might, I knew I’d have the deep rich color of the panorama but lose the detail in the shadow. The solution for the shadows was to use a 4-stop hard-step Graduated ND Filter. By taking a meter reading of the shadow area, I shot a series of manually bracketed frames, starting with the shadow exposure and then opening up one stop for each of four consecutive frames.
"I also realized that by doing this I would lose more of the rich color saturation with each step of increased exposure. Here the solution was to use the LB ColorCombo with the polarization set for a bit less than maximum effect to avoid over-polarizing and thus increasing the contrast. After all, my purpose here was to balance the exposure, cut the glare off the granite and enhance the green of the shaded trees. This capacity to enrich the greens makes both the LB ColorCombo and the LB Color Intensifier filters two of my favorite filters. Now with a fairly long exposure induced by the filters, I came away with the benefit of a slight blur in the clouds, lending a tranquil touch to the image.
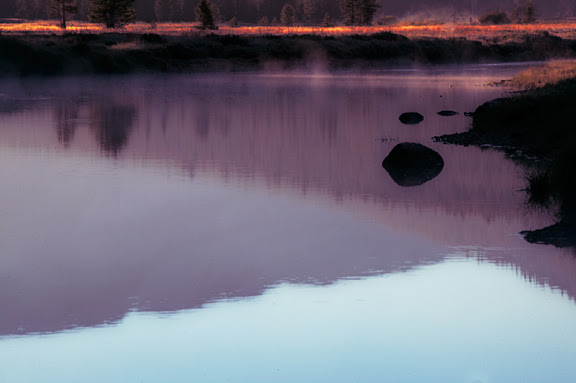
"On the banks of the Tuolumne River in early morning light the emotional attraction for me was seeing the steam rising off the river. The challenge was to find the angles that would offset, yet not overpower the subtleness of the setting. Once I found the lines that led into and out of the composition, the proposition became how to capture the colors. I set my exposure for the highlights and then opened up 3 stops using a 3-stop hard-step ND Grad. This gave me an exposure in the foreground that still rendered the right side of the bank almost in silhouette. I needed this contrast to set it all off. Next was adding the LB ColorCombo, carefully avoiding too much of the reflection in the water.
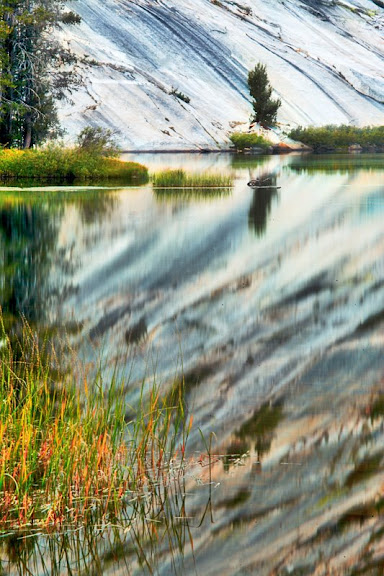
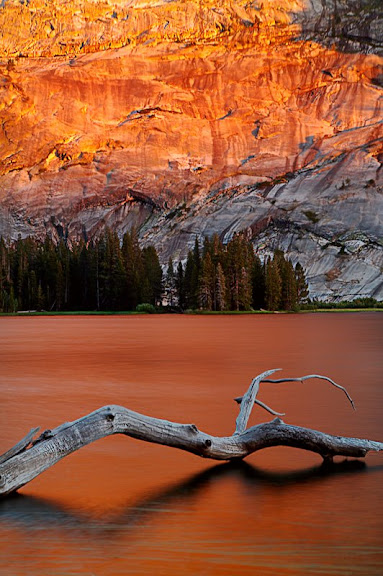
"These final two images were both captured along Merced Lake in Yosemite National Park, which is the second lake from the headwaters of the Merced River. The quiet seclusion of this high alpine setting, with deep granite walls falling sharply into the lake, create a setting as tranquil as any I’ve experienced.
"When I set up the image on the left it looked somewhat sterile through the viewfinder, however it was anything but when I surveyed the scene. What I was missing was the slight movement of the water in the foreground. I knew that a long shutter exposure was needed. The Vari-ND enabled me to extend my exposure just enough, and I also used my trusty LB Color Intensifier to step up the color saturation. As I increased the exposure I came closer to the glow of highlights that I liked but I was losing the one color that was most important to me. Green! The LB Color Intensifier is my usual choice to solve this problem.
"As I was shooting this image, the lake's surface was almost white-capped as the result of a strong wind. A 30-second exposure -- made possible by using my Singh-Ray Vari-ND -- changed the water's surface into a lovely gloss. Stacking the ColorCombo and then a 3-stop soft-step Graduated ND brought the exposure range into better balance and enhanced the green of the trees while holding back the glow of the granite. These steps resulted in a perfect rendering of the fallen tree in the foreground. By applying conscious thought to the choice of my filters and the way I use them, I have acquired a much better 'feel' for the way they will work in the field."
Steve and his unique approach to landscape photography are now featured in a new 100-minute DVD being released this week by Master Photo Workshops (Directed by Gregory McKean.) The new DVD, entitled "Every Picture Tells A Story," provides an in-the-field workshop experience packed with helpful information and clearly demonstrated techniques. You'll find more info on Steve's website or just order your copy today.
Friday, May 29, 2009
The more challenges we can solve with our filters, the more fun we seem to have
Arizona landscape photographer Steve Kossack applies years of experience and constant enthusiasm to the challenge of leading photo workshops throughout the American west. "Whenever filters are discussed in our workshops," says Steve, "the topic always brings out various opinions and views. Some seem to believe filters are magic, but others think they have no need for them now that the digital SLR camera is standard field issue. Some are just mystified or ambivalent about using filters -- which is reason enough to be attending a workshop. Earlier this month as we worked through a most rewarding workshop in Monument Valley, many of our Singh-Ray filters got a real workout. Here’s a look.
"One highlight of our workshop was this sunrise shot from the dunes of the Totem Poles. This classic image was helped immensely by the reflected light from the sand but we also had to control that same bright light striking the face of the rocks. Since I wanted to avoid the slight image distortion that would be caused by tilting the camera body upward, I simply raised the front of my 45mm Canon T/S (tilt/shift) lens fitted with the Singh-Ray LB ColorCombo filter. This image was the final shot of the morning. Before the sun rose and offered us this lovely image, I had begun the day using the LB Color Intensifier. It was the natural choice since there was no need for a polarizer and the 'lighter, brighter' Intensifier would not seriously slow the already long shutter speed. As the light became brighter the glare from the Totem Pole rocks became an even greater problem but the sand was still in deep shadow and reflected the blue of the sky. The LB Warming Polarizer was next out of my vest and it was about then that I also began using a 2-stop, soft-step Graduated ND filter, then switching later to a 3-stop, soft-step ND Grad and finally ending with a 4-stop hard-step that held the detail of soft glow in the sand.
"This iconic southwestern image was set up to be an action shot! I shot it that way to start. The sheep were herded down from under the arch in the shadow and then turned, on the run, away from us. My Canon 85mm 1.2L prime lens framed the scene perfectly and the light allowed both a very high shutter speed to stop the action and an acceptable aperture to hold focus in both the foreground and the arch. The LB ColorCombo was used here even though the objective was to freeze motion. I simply set the orientation of the filter's polarizer to cut the glare of both the sand and rock and then spot metered the sand. The intense color of the clothing and the richness of the arch detail was the great reward here!
"Perhaps a controlled burn around the Grand Canyon area or something like it in the atmosphere made our visit up on Hunts Mesa a hazy one. Still this unearthly place is not to be missed under any circumstance. A bad sunset or sunrise here is much better than an average one most anywhere else! I ran up against two major problems while there. I’ve already mentioned the haze and the second problem was a sustained wind that developed in late afternoon. Trying to narrow the composition and eliminate the sky as much as possible was my thought as I hiked to a point some distance from where I had started. I lined up the monuments and then went about stabilizing my 300 2.8L. An ISO of 800 was used to obtain as short a shutter speed as possible. I then started shooting with an f/8 aperture to hold as much depth of field as possible while still keeping the shutter time short. The haze problem was somewhat solved by using a drop-in 52mm Singh-Ray LB ColorCombo filter. This gave a needed contrast boost that carried the composition. As I left I was fairly certain that a good image was not possible, but I had a lot of fun trying! This one was a surprise.
"These final two images have much in common. Both were taken with Canon T/S lenses (45mm on the left and 24mm on the right) fitted with my thin-ring Singh-Ray LB ColorCombo. The thin filter ring has no threads on the front which reduces the chances of vignetting. Both frames were shot with the lenses shifted off-axis to their limits. The 45-mm lens was shifted up to capture as much of the side framing rock as possible and to eliminate the unnecessary foreground. The 24-mm lens was shifted to its full drop to capture the cactus in bloom while still framing the arch. With the ColorCombo mounted in a standard filter ring, these views would not have been possible because of vignetting. The combined benefits of the filter's polarizer and color intensifier are obvious here. An entirely different composition would have to be taken in both cases without the slim LB ColorCombo!
"Doing fine art landscape photography in the field becomes a passion for some of us. It’s the thrill of the hunt and the excitement of the chase. One more thing is very clear to me, filters are a mainstay in my photography because, when all is said and done, they add so much to the fun!"
You can see just how much fun Steve is having these days by visiting the extensive galleries on his website.
Friday, February 6, 2009
Landscape and wildlife images taken with your long lenses need Singh-Ray filters, too
Western landscape photographer Steve Kossack remembers it well. "When Singh-Ray introduced the LB (lighter, brighter) filter series, it meant that I could begin using these new filters in shooting situations where I would not have before. Because the new LB Warming Polarizer transmitted 66% more light than Singh-Ray's previous polarizer -- requiring only 1-1/3 more f-stops of additional exposure in most cases -- I began using it much more frequently, even in low light. More recently, we've been blessed with digital cameras capable of capturing top-quality images at much higher ISO settings -- which makes it even easier these days to achieve proper exposures with a polarizer on my long lenses.
"Although more and more outdoor photographers now realize they can improve their landscape images by using polarizers, not so many consider the importance of polarizing their long-lens images. One lesson I learned years ago is to always polarize any lens that's 300mm or longer. Even with the high quality of today’s lenses, I find there's frequently a loss of contrast unless I use a polarizer. I may not always see the benefit of using the polarizer while I'm in the field, but I do see it in the final print. Since I have always considered my Canon 300mm 2.8L IS to be my finest lens -- I also have the 500mm f/4 IS and borrow a 600mm for wildlife use -- I like to shoot with it just as often as possible. But it wasn't until I realized I could up-grade my standard Canon drop-in polarizer with Singh-Ray's three polarizers that I found the right answer. I now have the LB ColorCombo, LB Warming Polarizer and Gold-N-Blue Polarizer mounted in Canon Polarizer drop-in filter holders that have the little wheel on top that lets me quickly rotate the polarizer with finger tip control. Since I began using these three drop-in filters, I can’t imagine a time when I didn’t!
"The not-so-typical landscape above of the Navajo power plant at dawn was captured during one of our Landmarks of the Southwest workshops. It is at once magical, mystical and sinister! Shooting with a 600mm lens -- even from a more than a mile away -- would have brought the plant too close and revealed the plant for what it is, cold steel and all business. Choosing the shorter Canon 300mm 2.8L IS, however, gave me more of a panorama of the scene and hid the nasty details. The Gold-N-Blue drop-in not only captured more of the warm glow to the lights but the filter factor was also a bonus making for a longer exposure which produced the desired effect.
"As we watched the elk herd cross Yosemite's Madison River in the pre-dawn light, I took off with Canon 600mm f/4L IS attached to the Canon 1Ds MKIII with and Black Widow gimble mount on a Gitzo 1348 tripod over my shoulder. I also had with me a Canon 1.4 extender and my drop-in filters in my vest pockets. Wow, makes me tired just to think about it now! As the herd moved, I’d stop, set up, shoot and then move along with them. Using an ISO between 400 and 800 I was able to stop most of the motion in the low light by shooting with the lens wide open. As the light increased and the elk moved into and around the river a huge problem ensued. The reflected light from the river was like a spot light! The glare was almost blinding as I searched for an angle that would decrease its intensity. While doing this I realized that I was also helping myself by finding a 90-degree-to-the-sun shooting angle where I could block more of the glare from the reflecting sunlight. After finding the right location, I inserted the 52mm ColorCombo drop-in, focused on the river, turned the orientation of the filter to decrease the reflected light as much as possible and then dialed it in the highest ISO I thought appropriate. With only a filter factor of 1-3/4 stops there was not much downside and plenty of up for its use. Now I simply waited for the elk.
"This duck pond was set up prior to the ducks' arrival on the scene. Schwabacker Landing in the Grand Tetons is a natural just after sunrise. The stillness of the setting was serene in the morning glow, and I was struck by the out-of-focus backdrop that the wide open aperture was providing. The fact that reflection of the sky was not as pronounced as it might have like led me to choose the Gold-N-Blue drop-in and reposition the camera for a stronger polarized effect. I shot several frames before the ducks suddenly appeared. The downside is that there is no direct light on them but the upside is that the beautiful reflection, which was my focal point after all, was broken up by them. 'Oh...' I exclaimed to no one in particular as they approached, 'Cue the ducks!'
"This otter image was also improved by using my drop-in ColorCombo. These guys are faster than lightning and their most attractive behavior is usually in groups. To make matters worse, they were playing on the distant bank of the Snake River across from our shooting position. This required the use of my 1.4 extender on the 600 f/4 lens which meant giving up a full stop of light that in turn slows the auto focus considerably. My solution was to manually focus on one otter and wait for it to stop in some sort of pose. I knew from previous experience that otters, for some reason, all come to a stop for a split second at intervals. I just needed to anticipate one of those split seconds! I also figured at this juncture in my shoot that if I were to capture what I was looking for, maybe a slower shutter speed would be OK. As you might expect, I shot a lot of single frames but not as many as I might have just firing the shutter as one does in fast action sequence. The result was a pleasing soft background with a nice patch of saturated green grass, and yes, the otters are cute as they can be.
"From previous experience, I can assure you the color saturation and contrast in each of these images were improved by using one of my drop-in polarizers. Considering the heavy cost of my long lenses -- as well as the heavy lifting they require in the field -- I realize that investing in Singh-Ray drop-ins was a relatively easy way to get even better images."
To see hundreds more of Steve's distinctive outdoor photographs, or to learn about his workshops and instructional videos, visit his website.
To upgrade your drop-in polarizer, you'll need to ship the drop-in polarizer that fits your lens to Singh-Ray along with payment for the LB Warming Polarizer glass plus $50 custom mounting fee ($260 + shipping). This service is also available for our Gold-N-Blue Polarizer ($240 + shipping), or LB ColorCombo ($420 + shipping). For more information, call Singh-Ray at 863-993-4100.
Friday, January 2, 2009
Returning to photograph Death Valley is like going home again... very rewarding!
Arizona-based landscape photographer Steve Kossack says, "It's interesting that the classic novel You Can't Go Home Again, by Thomas Wolfe, was published in 1940 -- two years after the author's death. I think the title, however, is generally thought to mean it’s not because home is different; it’s because we are different.
"Going back to any place that I've come to love really stirs my soul. It's a great motivator. I’ve now done more than a dozen workshops, for example, in the fabulous area known as Death Valley. It's not only the first place I learned both geographically and photographically, but it's become one of my favorite workshop 'homes' and the one that participants are most interested in revisiting. Returning in different seasons, year after year, and seeing the vast open spaces -- along with the hidden gems -- through the fresh eyes of our workshop participants helps keep the creative drive alive and burning. For me, it’s never the same place twice.
"I especially enjoy revisiting a place in different seasons. The light and the weather will always be different. These first two images show the same view of Zabriski Point in early morning light. It's the seasonal difference in light between the top image taken in spring and the second image taken in the fall that changes everything. The warmth of the spring image with the sun at a much higher angle forced a solution to a common problem. The background was bathed in rich light with the foreground in deep shadow. I chose the nearest lighted formation (the colorful ridge on the right) as my focal point and moved it off center as a way to lead the eye back and forth to the lightest object (the salt flats on the valley floor) and give a way out of the composition to the right. The balanced exposure was achieved with a Singh-Ray 4-stop hard-step Graduated Neutral Density filter carefully placed to not show the edge in the foreground.
"I paid close attention to the highlights as I exposed the fall image. The composition is based on those highlights. The extremely low angle of the light provided a more intimate look at the fantastic geologic shapes and forms. One of the focal points for me when shooting at Zabriski Point has always been a small dark mound in the bowl just before the ridge that leads the eye to the salt flats beyond. In the spring image it is still effective, but it became dominant when captured in the fall image. Now bathed in light, the color was saturated. With this in mind, the Singh-Ray LB Color Intensifier was chosen. I had looked at the LB ColorCombo earlier but the slim benefits of its polarizer were negated by the high winds that we were exposed to on this morning. I knew the ancient seabed before us was not going to move, but the tripod and camera might! I gained 1-1/2 f-stops by using the LB Color Intensifier and an ISO setting of 800, which resulted in a much faster shutter speed. This is a great example of why I carry both the ColorCombo and the Color Intensifier filters!
"Returning to the high ranges of Death Valley is a treat for my senses and my landscape photography. I like to plan a workshop around a full moon whenever possible. Watching the rising moon during a colorful sunset can be a thrill in itself.
"To try capturing the moonrise in an image -- such as this third photo -- takes some thought and a little technique as well. The moon is a sunlit object so exposure has to follow this rule. It is also moving (rising) more quickly than you might think so this must be taken into consideration as well. With a long lens (greater magnification), all these factors are even more pronounced. With a blanket of haze on the horizon and a very dim but evenly lit foreground, the moon suddenly appeared. It only lasted a few seconds. I had been shooting detail with the Canon 300 2.8L lens and my Singh-Ray 52mm LB ColorCombo drop-in filter to intensify the already saturated color that the reflected light bestowed on the scene. Fortunately all I needed to do was reframe the image and quickly figure out an exposure. I say fortunately because that’s all I had time for. This lovely composition disappeared within seconds!
"I include the fourth image of Dante’s Dawn mostly because both it and the moonrise image are what I call 'bookends.' They span the end of one day and the beginning of the next, and were taken from the same location more than a mile above the valley floor. I was shooting detail of the ridgeline on the far right when the moonrise ended the previous day. Once again, deep saturated color in the pre-dawn was the attraction. The use of the LB ColorCombo -- even before there was much skylight to polarize -- helped accentuate the glow of the blue and magenta in the sky and cut just a little of the haze as well. To further heighten the color and give a better reading to the mid-tones and shadows, a Singh-Ray 2-stop soft-step Graduated ND filter was also used.
"I'm convinced," says Steve, "we can all go home again! For me Death Valley is much like home and every time I'm there, I’m different, and in some way so is my work. The key is to f/8 and be there!"
There are about 100 more Death Valley landscape images, not to mention a number of other galleries, colorful how-to essays and news about his various 2009 workshops on Steve's website.
Subscribe to:
Posts (Atom)